
Introduction
Remove color from image editing is useful when you need to make a specific color transparent create a clean background isolate an object or prepare a graphic for a new design. For example, you may want to remove a white background from a product photo eliminate a green screen or turn one unwanted color into transparency.
The good news is that you do not always need advanced photo editing skills. With the right tool and a simple workflow you can remove a selected color while keeping the main subject sharp and natural.
In this guide you will learn how to remove color from image files which methods work best for different situations common editing mistakes and how BGImageSnap can help simplify the process.
Table of Contents
- Quick Answer
- What Does Removing a Color From an Image Mean?
- How to Remove Color From Image With BGImageSnap
- Other Ways to Remove a Color
- When Should You Remove a Specific Color?
- Common Mistakes to Avoid
- Tips for Better Results
- FAQ
- Conclusion
Quick Answer
To remove color from image upload your image to a color removal or background editing tool select the unwanted color adjust the selection tolerance if necessary, preview the result, and download the edited image. For simple backgrounds and isolated objects an online tool such as BGImageSnap can make the process much faster.
What Does Removing a Color From an Image Mean?
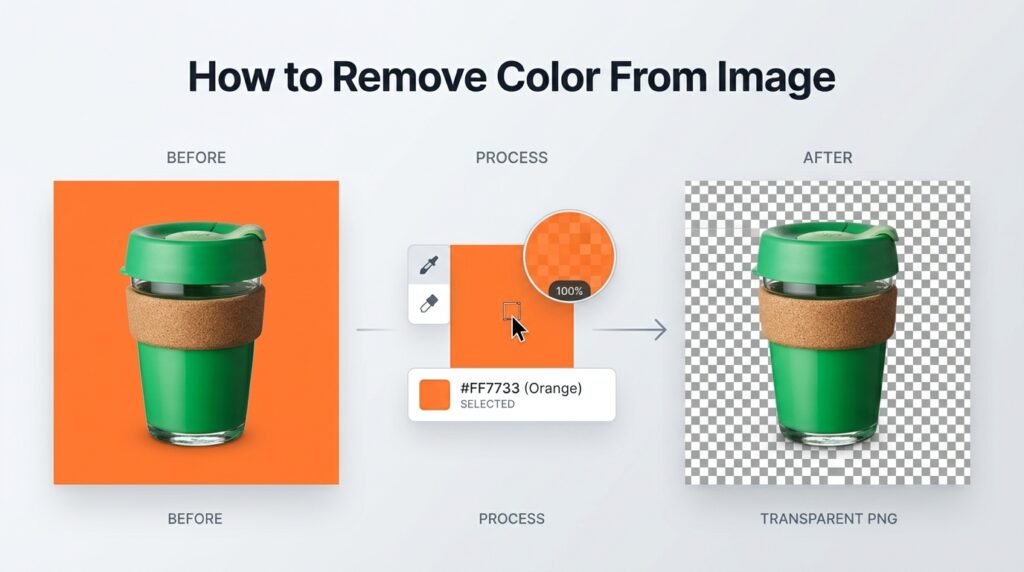
Removing a color usually means selecting one specific color or color range and making it transparent or replacing it with another background.
This is different from converting an image to black and white. A black and white effect changes the entire image while color removal targets a specific color.
For example, suppose you have a product photographed against a plain white background. You can remove the white color and make that area transparent. The product remains visible while the background disappears.
This technique is commonly used for:
- Product images
- Logos
- Social media graphics
- Website assets
- Presentations
- Digital artwork
- Green screen images
How to Remove Color From Image With BGImageSnap
BGImageSnap can be useful when you want a simple online workflow instead of working through complicated desktop editing software.
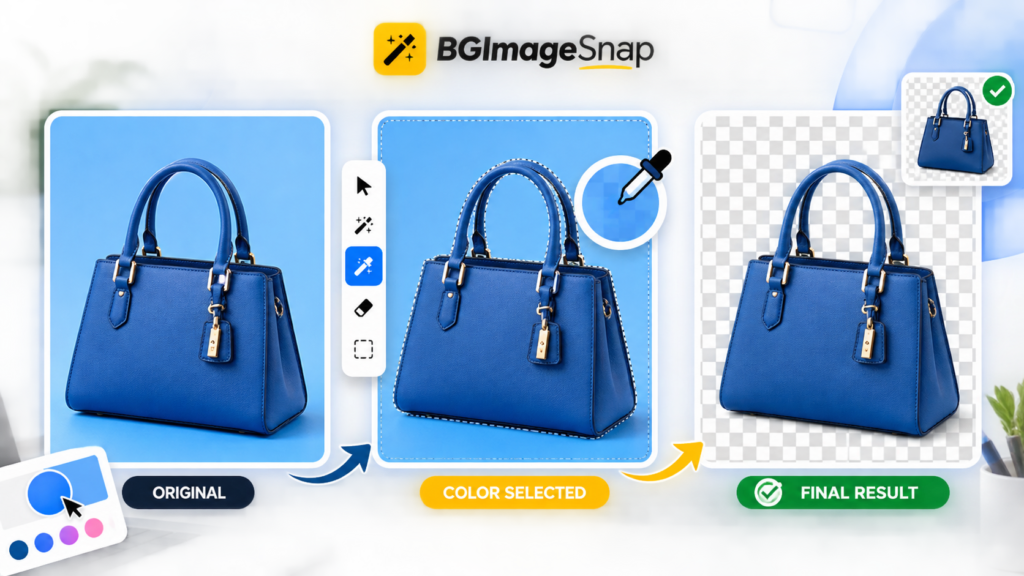
Step 1: Choose Your Image
Start with a clear image that contains the color you want to remove. A simple background usually produces cleaner results because the selected color is easier to separate from the subject.
Step 2: Upload the Image
Open the BGImageSnap website and upload your image.
For the best results use a reasonably high quality image. Low resolution images may contain blurry edges or compression artifacts that make color selection less precise.
Step 3: Select the Color
Identify the unwanted color in the image. This might be white, green, blue, or another solid background color.
Select the color you want to remove and preview the result.
Step 4: Adjust the Selection
Some images contain several shades of the same color because of lighting shadows or compression.
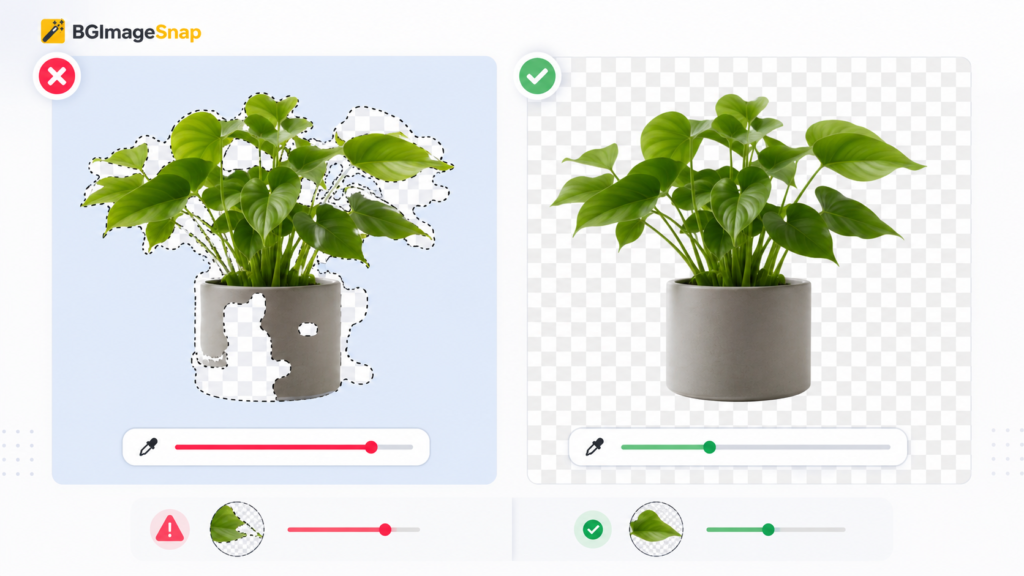
If parts of the background remain visible increase the color tolerance gradually. Be careful not to increase it too much because nearby colors belonging to your main subject could also disappear.
Step 5: Check the Edges
Zoom in around hair, clothing, product edges, text, and other detailed areas.
A good result should preserve the important parts of your subject without leaving obvious color halos around the edges.
Step 6: Download the Result
Once the image looks clean export it in a format that supports transparency when needed such as PNG.
A transparent PNG is especially useful when you plan to place the edited subject over a different background.
Other Ways to Remove a Color
Online tools are not the only option. You can also remove selected colors through professional image editing software.
Adobe Photoshop
Photoshop offers advanced selection and masking tools for detailed color removal. It is useful when you need greater control over edges, shadows, gradients, and complex subjects.
Adobe provides official documentation for its image editing and selection features through the Adobe Photoshop Help Center.
GIMP
GIMP is another option for users who want a free desktop image editor. It includes selection tools that can help isolate colors and remove backgrounds.
You can learn more through the official GIMP documentathttps://docs.gimp.org/ion.
Manual Selection
For complicated images manual selection can sometimes produce better results than automatic color removal. This approach takes more time but gives you greater control over exactly which pixels remain visible.
When Should You Remove a Specific Color?
Removing a color is particularly helpful when the unwanted color is concentrated in a clear area.
Product Photography
Online stores often need products isolated from plain backgrounds. Removing a background color can create cleaner product listings and make images easier to reuse.
Logos and Graphics
A logo designed on a solid background may need that background removed before it is placed on a website, video, presentation, or marketing design.
Green Screen Editing
Green backgrounds are commonly removed from photos and videos so that another scene can be inserted behind the subject.
Website Design
Transparent image assets can blend more naturally with different website backgrounds instead of displaying a visible rectangular background.
Common Mistakes to Avoid
Removing Too Much Color
One of the most common problems is using an overly broad color range. This can remove parts of the subject that are similar to the selected background.
Ignoring Shadows
A shadow may contain several shades of the same background color. Removing the main color without checking the shadow can leave visible patches behind.
Using a Low Quality Image
Highly compressed images often have fuzzy edges and color artifacts. These can make precise removal more difficult.
Forgetting Transparency
If the goal is to create a transparent background make sure the final export format supports transparency. Saving the result as a format that replaces transparency with a solid background can undo part of the editing process.
Tips for Better Results
Use images with clear separation between the subject and background whenever possible.
Start with a small color tolerance and increase it slowly.
Always inspect detailed edges before downloading the final file.
Use PNG when transparency is important.
For complex photographs combine automatic selection with manual cleanup.
Keep an original copy of the image before making major edits.
Visual Opportunities
A before and after comparison would help readers understand how color removal works.
A simple three step infographic could also show:
Original Image → Color Selection → Transparent Result
For an educational example a visual showing a product with a white background removed would be especially useful.
FAQs
How do I remove one color from a picture?
Upload the image to a color selection or editing tool choose the unwanted color adjust the tolerance preview the result and export the edited image.
Can I remove white from an image?
Yes. White backgrounds are often easier to remove when the subject has clear contrast against the background.
How do I make one color transparent?
Select the color and replace or delete it while preserving transparency. Exporting the final image as PNG is often appropriate when transparency must be retained.
Can I remove a background without Photoshop?
Yes. Online tools can handle many common background removal and color selection tasks without requiring Photoshop.
What image format is best for a transparent background?
PNG is a common choice because it supports transparent areas while maintaining image quality.
Why does part of my subject disappear when I remove a color?
The selected color range may be too broad. Reduce the tolerance or use more precise masking around areas of the subject that contain similar colors.
Is removing color the same as making an image black and white?
No. Removing a color targets a selected color or range while black and white conversion changes the appearance of the entire image.
Can I remove color from a complex photograph?
Yes, but complex images usually require more careful selection and edge cleanup because the target color may appear in multiple areas of the photo.
Conclusion
Learning how to remove color from image files can make product photos, logos, graphics, and creative assets much easier to reuse. The key is to select the unwanted color carefully control the selection range and inspect the final edges before export.
For simple editing tasks BGImageSnap provides a convenient way to work with image backgrounds and color based editing without relying entirely on complicated software. For highly detailed images professional tools such as Photoshop or GIMP may provide additional control.
The best results come from using a high quality source image and making small adjustments rather than removing a large color range all at once.
Remove Color Now? click here




[…] How to Remove Color From Image […]
[…] How to Remove Color From Image […]