Introduction
You’ve taken a breathtaking photo golden hour lighting, perfect composition, emotional moment captured. But when you open it on your computer, something feels off. The colors look flat. The shadows are blocked. You try to fix it… and the image falls apart.
If this sounds familiar, you’re not alone. Most photographers beginners and pros alike struggle with one critical decision: RAW vs JPEG.
The choice between these two formats isn’t just technical it’s creative. It affects your workflow, storage needs, editing freedom, and final image quality. Yet, most guides overwhelm you with jargon. Others oversimplify: “Use RAW if you’re serious.”
This guide cuts through the noise. We’ll break down exactly what RAW and JPEG mean, when to use each, and how to make the best choice for your photography goals all without fluff, hype, or manufactured stats.
By the end, you’ll know not just what to choose, but why and how to get the most out of either format.
Short answer:
Use RAW if you edit photos, care about quality, or shoot in challenging light.
Use JPEG if you want small files, quick sharing, or don’t edit much.
Key Takeaways:
✅ RAW files = Unprocessed, high detail data from your camera sensor
✅ JPEG files = Processed, compressed, ready to share images
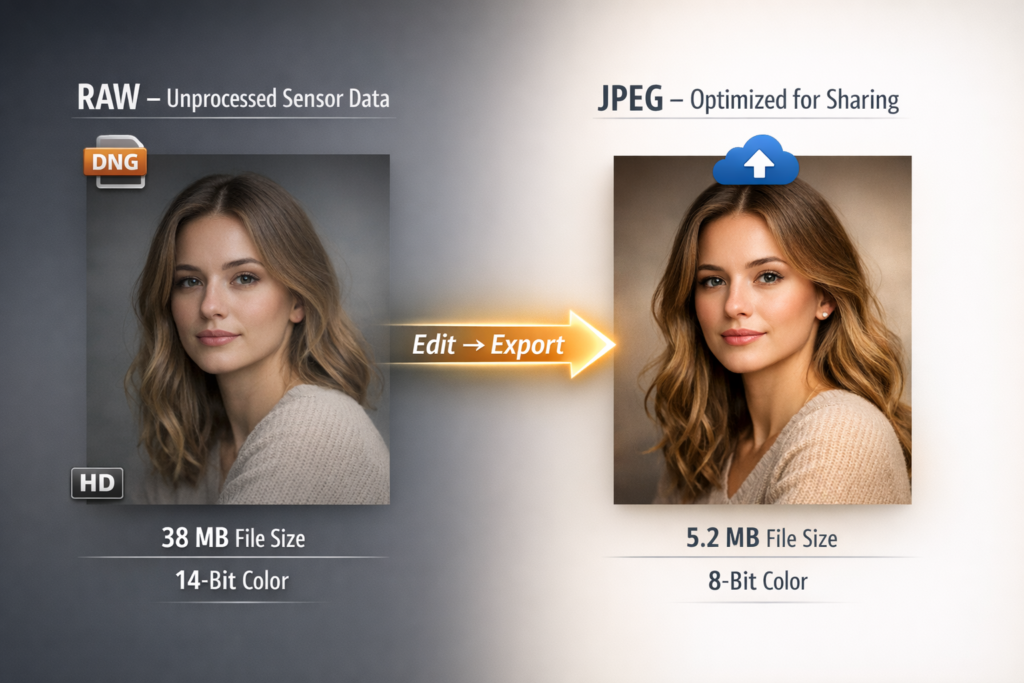
✅ RAW is 5–10x larger than JPEG but retains 10–14 bits of color data per channel
✅ JPEG is universally compatible no special software needed
✅ You can’t convert JPEG to RAW you lose data permanently when shooting JPEG
✅ Most pros shoot RAW even if they later export to JPEG
Best for beginners? Shoot in RAW+JPEG mode. Get the best of both worlds.
What Is RAW? (And Why It’s a Digital Negative)
RAW Is Not a Format It’s a Container
Unlike JPEG, RAW isn’t a single standard. It’s a family of proprietary formats:
- Canon: .CR3, .CR2
- Nikon: .NEF
- Sony: .ARW
- Fujifilm: .RAF
- Adobe: .DNG (universal RAW)
RAW files store unprocessed sensor data every pixel’s brightness, color, and exposure information before your camera applies sharpening, white balance, or compression.
Think of it like a digital negative. Just as film negatives hold all the light captured on film, RAW files hold all the data your sensor recorded. The camera doesn’t decide how it looks you do.
Why This Matters
When you shoot JPEG, your camera applies:
- White balance adjustments
- Contrast and saturation boosts
- Sharpening
- Compression to reduce file size
All of this is baked in. You can’t undo it.
With RAW, you control every step during editing.
Example: A JPEG taken at sunset might look “too orange” because your camera auto set white balance to “cloudy.” In RAW, you can reset it to “sunset” or even “daylight” without losing detail.
What Is JPEG? (And Why It’s Everywhere)
JPEG = Joint Photographic Experts Group
JPEG is a lossy compression algorithm meaning it discards image data to shrink file size. It’s the most common image format on the planet because:
- Works on every device
- Loads fast on websites
- Requires no special software
- Fits hundreds of photos on a single memory card
Your camera takes the sensor data, applies its own preset (or your settings), compresses it, and saves it as a JPEG.
What You Lose in JPEG
When your camera compresses a JPEG, it:
- Reduces color depth from 12–14 bits to 8 bits (16.7 million colors instead of billions)
- Blurs fine details to hide compression artifacts
- Discards subtle gradients (like skies or shadows)
- Applies permanent sharpening and noise reduction
The result? A small, ready to share image that looks fine on Instagram but crumbles under heavy editing.
⚠️ Critical fact: Once saved as JPEG, lost data is gone forever. You can’t recover it.
RAW vs JPEG: Side-by-Side Comparison
| Feature | RAW | JPEG |
|---|---|---|
| File Size | 20–100 MB per image | 2–10 MB per image |
| Color Depth | 12–14 bits per channel (billions of colors) | 8 bits per channel (16.7 million colors) |
| Editing Flexibility | Extremely high recover highlights, shadows, white balance | Limited adjustments cause banding or noise |
| Compatibility | Requires software (Lightroom, Photoshop, Capture One) | Works on every phone, browser, printer |
| Shooting Speed | Slower burst rates, longer write times | Faster burst, quicker storage |
| Storage Needed | 5–10x more than JPEG | Minimal |
| Best For | Professional work, editing, printing | Social media, quick sharing, casual use |
| Quality Loss | None (uncompressed) | Permanent, irreversible compression |
Real World Example
You photograph a dark interior with a bright window.
- JPEG: Window is blown out (pure white). Shadows are flat.
- RAW: You can recover the window’s detail, darken the highlights, lift shadows, and still keep natural skin tones.
That’s the power of RAW.
When to Use RAW: 5 Ideal Scenarios
1. You Plan to Edit Your Photos
Whether you’re tweaking exposure, recovering shadows, or adjusting color grading, RAW gives you room to breathe. JPEG files break down fast under heavy edits.
2. You Shoot in Challenging Lighting
Low light, high contrast, mixed lighting (e.g., indoor events with tungsten and LED lights)? RAW lets you fix white balance and exposure without introducing noise or banding.
3. You Print Your Photos
Professional printers need high resolution, high bit depth files. RAW ensures color accuracy and detail retention especially for large format prints.
4. You’re Building a Portfolio or Selling Work
Clients and galleries expect professional grade files. RAW gives you archival quality and future proofing.
5. You’re Learning Photography
Shooting RAW forces you to understand exposure, white balance, and post processing. It’s the best way to learn how light and color work.
💡 Pro Tip: Many pros shoot RAW and export final versions as JPEG or TIFF for delivery.
When to Use JPEG: 4 Practical Cases
1. You’re Taking Casual Snapshots
Family dinners, vacations, petsphotos you won’t edit. JPEG is perfect.
2. You Need Fast Turnaround
Wedding photographers often shoot JPEG for second shooters or quick social media posts. No editing = faster delivery.
3. Your Storage Is Limited
If you’re using a phone, drone, or action camera with small memory cards, JPEG saves space.
4. You’re Sharing Directly to Social Media
Instagram, Facebook, TikTok all platforms accept JPEG. Uploading RAW is unnecessary and slow.
💡 Pro Tip: Use RAW+JPEG mode on your camera. You get both. Edit the RAW, share the JPEG.
How to Shoot RAW (And Convert It Later)
Step 1: Enable RAW Mode on Your Camera
DSLR/Mirrorless (Canon, Nikon, Sony, etc.):
- Go to Menu → Image Quality
- Select RAW or RAW+JPEG
- Confirm your memory card has enough space
Smartphones (iPhone/Android):
- iPhone: Shoot in HEIC (similar to JPEG, but better). No true RAW unless using Pro apps like ProCamera.
- Android: Use manual camera apps (Open Camera, ProShot) to capture DNG (Adobe’s RAW format).
Step 2: Transfer Files to Your Computer
Use a card reader or USB cable. Avoid dragging files directly from phone quality can degrade.
Step 3: Edit in Professional Software
Use:
- Adobe Lightroom (free trial available)
- Capture One
- Darktable (free, open source)
- Affinity Photo
Step 4: Export as JPEG for Sharing
After editing:
- Export as JPEG, Quality 90–100%
- Resize to 2048px on the long side for web
- Embed color profile (sRGB)
✅ Always keep your original RAW files. They’re your digital negatives.
Common Mistakes with RAW and JPEG
Mistake #1: Shooting JPEG and Thinking “I’ll Edit Later”
You can’t recover blown highlights or crushed shadows in JPEG. The data is gone.
Mistake #2: Deleting RAW Files After Exporting JPEG
You might never need to re edit… until you do. Keep RAW files for archival.
Mistake #3: Using Low-Quality JPEG Settings
Many cameras default to “Fine” or “Normal.” Set to “Super Fine” or “High” to minimize compression.
Mistake #4: Assuming RAW = Instantly Better
RAW files look flat and dull straight out of camera. They need editing. Don’t judge RAW by its unprocessed state.
Mistake #5: Trying to Convert JPEG to RAW
It’s impossible. Tools that claim to “enhance JPEG to RAW” are scams. They just upscale and sharpen. You’re not gaining data you’re guessing.
Can You Convert JPEG to RAW? (Spoiler: No)
Short answer: No.
RAW files contain the original sensor data. JPEG is a processed, compressed version that throws away 80–90% of that data.
You can:
- Open a JPEG in Lightroom
- Edit it
- Save it as a TIFF or PNG (lossless formats)
But you’re still working with a JPEG’s limited data. You won’t recover lost detail.
🚫 No software can magically restore lost data.
✅ Only RAW files preserve it.
FAQs
1. Should I shoot RAW or JPEG as a beginner?
Start with RAW+JPEG. You get the flexibility of RAW for editing and the convenience of JPEG for quick sharing. Once you’re comfortable editing, switch to RAW-only.
2. Does shooting RAW make my photos look better automatically?
No. RAW files look flat and dull straight out of camera. They need editing. But they give you the tools to make them look exactly how you want.
3. Do I need a powerful computer to handle RAW files?
Not necessarily. Modern laptops and even tablets (iPad Pro + Lightroom) handle RAW fine. Storage is the bigger issue—you’ll need 10x more space than for JPEG.
4. Can I shoot RAW on my smartphone?
Most phones don’t support native RAW. Use apps like ProCamera (iOS) or Open Camera (Android) to capture DNG files. iPhones save HEIC, which is better than JPEG but not true RAW.
5. What’s the best file format for printing?
TIFF (lossless) or high-quality JPEG (95–100%) are standard. But always start from a RAW file for best results.
6. Will RAW files work on Instagram or Facebook?
No. These platforms only accept JPEG, PNG, or HEIC. Always export your edited RAW as a JPEG for sharing.
7. Is RAW better for astrophotography?
Yes. RAW’s higher bit depth and dynamic range are essential for capturing faint stars and reducing noise in dark skies.
8. How much extra storage does RAW take?
A typical 24MP RAW file is ~35MB. A JPEG from the same camera is ~6MB. That’s almost 6x more storage. A 64GB card holds ~1,800 JPEGs or ~300 RAW files.
Conclusion
Choosing between RAW vs JPEG isn’t about being “serious” or “casual.” It’s about matching your workflow to your goals.
Use this simple flow:
- Are you editing? → RAW
- Are you printing or archiving? → RAW
- Are you sharing quickly on social media? → JPEG
- Are you unsure? → RAW+JPEG (best of both worlds)
RAW is insurance.
It gives you creative control when lighting, exposure, or color doesn’t go as planned.
JPEG is efficiency.
It’s perfect for moments where speed and simplicity matter.
Most photographers use both. You don’t have to choose one forever.
The best photographers aren’t the ones with the fanciest gear they’re the ones who understand their tools.
Ready to Take Better Photos? Start with the Right Format
If you’re shooting RAW and need to edit, enhance, or convert your files to high quality JPEGs for sharing BGImageSnap makes it simple.
Our RAW to JPEG Converter lets you batch process RAW files, adjust exposure, color, and sharpness, and export print ready or web optimized JPEGs all in seconds.
No software to install. No subscription. Just powerful, professional results.