If your photo was rejected for passport, you’re not alone. Thousands of U.S. applicants face this frustrating delay each month often because of small, avoidable errors that seem harmless but violate strict federal guidelines.
A rejected passport photo can mean weeks of delays, missed trips, and extra fees. The good news? Most rejections are caused by predictable mistakes and they’re easy to fix if you know what to look for. In this guide, you’ll learn the 7 most common reasons photo rejected for passport applications in the USA backed by U.S. Department of State guidelines and exactly how to fix each one. Whether you took the photo at home, used a kiosk, or visited a pharmacy, we’ll show you how to get it right the first time. And if you’re ready to skip the guesswork?
We’ll also show you how to use BGImageSnap.com to generate a passport-compliant photo in under 60 seconds no camera, no studio, no stress.
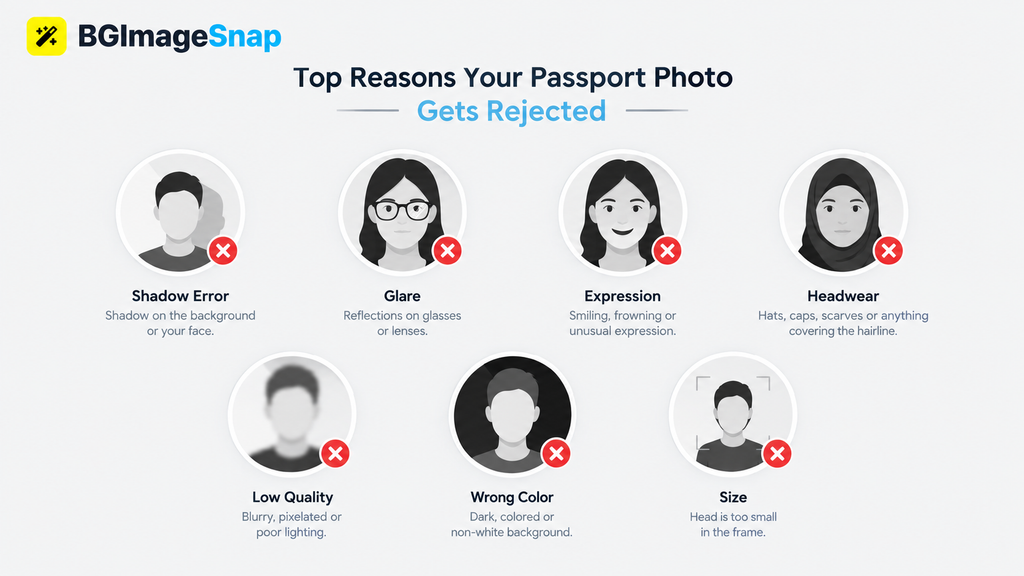
Quick Answer: 7 Reasons Your Photo Was Rejected
If your photo was rejected for passport, here are the 7 most likely causes and how to fix them fast:
| Reason | Fix |
|---|---|
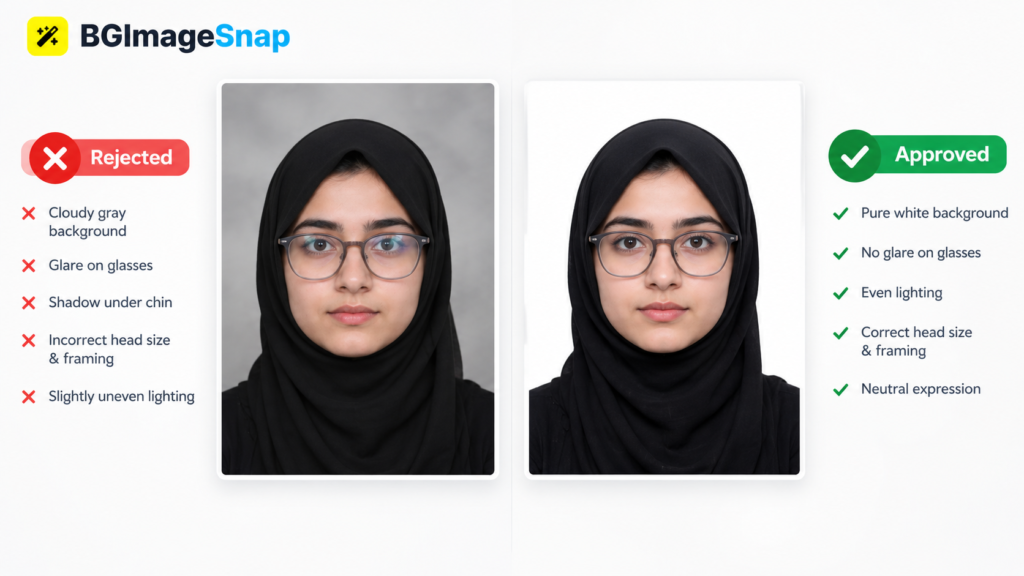
| 1. Wrong background color | Use pure white or off-white, no patterns or shadows |
| 2. Poor lighting | Use soft, even lighting from two sources |
| 3. Shadows on face or wall | Move away from walls, avoid direct sunlight |
| 4. Glasses or glare | Remove glasses or adjust angle to eliminate reflections |
| 5. Smiling or frowning | Keep mouth closed, neutral expression |
| 6. Head too small/large | Face must occupy 50–70% of image height |
| 7. Blurry or low-res | Use a high-quality camera, avoid phone zoom |
Why Passport Photos Get Rejected The Official Rules
The U.S. Department of State sets strict standards for passport photos under 22 CFR 51.1. These rules exist to ensure facial recognition systems can accurately verify your identity and to prevent fraud.
Your photo must be:
- 2 x 2 inches (51 x 51 mm)
- Color, taken within the last 6 months
- Plain white or off-white background
- Full face, front view, eyes open
- No shadows, glare, or filters
- No headwear (except for religious reasons, with documentation)
- No glasses unless medically necessary (with signed statement)
The photo must be printed on thin, high-quality photo paper not regular printer paper.
Why does this matter?
Passport photos are scanned by automated systems that compare your face to biometric data. Even a slight shadow or reflection can cause a mismatch triggering rejection.
📌 Source: U.S. Department of State Passport Photo Requirements (DoFollow)
7 Common Reasons Photo Rejected for Passport (With Fixes)
1. Background Isn’t Pure White or Off-White
Problem:
Many applicants use a beige wall, a window-lit room, or even a white bedsheet which often appears gray, yellow, or textured in photos.
Fix:
Use a pure white backdrop. Avoid patterns, folds, or shadows. If shooting at home, hang a white sheet or poster board at least 2 feet behind you.
Pro Tip:
Use the BGImageSnap.com background checker tool upload your photo and instantly see if your background meets U.S. passport standards.
2. Your Face Is Too Dark or Too Bright
Problem:
Overexposure (face washed out) or underexposure (face too dark) are top rejection triggers. This often happens with phone cameras in natural light.
Fix:
Use soft, diffused lighting not direct sunlight or overhead fluorescents.
→ Place a lamp on each side of your face at 45-degree angles.
→ Avoid window light it creates harsh contrasts.
Example:
A photo taken at noon by a window? Likely rejected.
Same photo taken at 10 a.m. with two soft lamps? Approved.
3. Shadows on Your Face or Behind You
Problem:
Shadows make facial features hard to detect and automated systems flag them as “non-compliant.”
Fix:
- Stand at least 2 feet away from any wall.
- Avoid casting shadows from your head or shoulders.
- Use two light sources to cancel out shadows.
Visual Tip:
Take a test shot. If you see a gray or dark area behind your head even slightly you’re at risk.
4. You’re Wearing Glasses or Reflective Accessories
Problem:
Glasses cause glare even anti-reflective coatings aren’t always enough.
Hats, headbands, earrings, or necklaces can also be flagged if they obscure facial features.
Fix:
- Remove glasses if possible.
- If you must wear them: tilt them slightly downward, adjust lighting to eliminate reflections, and ensure your eyes are fully visible.
- Remove jewelry or accessories that distract from your face.
Never wear sunglasses even for medical reasons unless you submit a signed doctor’s note.
5. Your Expression Isn’t Neutral
Problem:
Smiling, frowning, raised eyebrows, or parted lips are common — and all are rejected.
Fix:
- Keep your mouth closed, no teeth visible.
- Look straight at the camera.
- Relax your face think “resting face,” not “smiling for the camera.”
Myth Busting:
You don’t need to look serious just neutral. A slight, natural expression is fine. But if your cheeks are lifted or your lips are curved it’s a reject.
6. Head Size or Position Is Wrong
Problem:
Your head must occupy 50–70% of the photo’s total height. Too small? Rejected. Too close to the top? Rejected.
Fix:
- Measure your face from chin to crown.
- In the final image, that distance should be between 1 inch and 1.375 inches (25–35 mm).
- Your eyes should be positioned 1–1.375 inches from the bottom of the photo.
Quick Check:
Print your photo. Hold it up to a ruler. If your head looks tiny or squished it’s wrong.
7. Photo Is Blurry, Pixelated, or Cropped Poorly
Problem:
Phone selfies taken in low light, zoomed in, or poorly cropped are the #1 cause of rejection for DIY photos.
Fix:
- Use a high-resolution camera (12MP+).
- Take the photo in natural daylight or with studio lighting.
- Don’t crop manually use a passport photo tool that auto-crops to exact specs.
Warning:
Photos from kiosks (like Walgreens or CVS) are often rejected because they auto-crop too tightly or compress the image.
How to Take a Passport Photo That Passes Every Time
Here’s a simple 5-step method to guarantee approval:
- Set Up
→ Use a plain white wall or white backdrop.
→ Stand 2 feet away from it.
→ Place two soft lamps at 45-degree angles to your face. - Dress & Pose
→ Wear solid-colored clothing (no white).
→ Remove glasses, headwear, and jewelry.
→ Look straight ahead, mouth closed, neutral expression. - Take the Photo
→ Use a tripod or prop your phone on a stack of books.
→ Use timer mode to avoid motion blur.
→ Take 5–7 shots don’t settle for the first one. - Check the Specs
→ Size: 2×2 inches
→ Resolution: 600×600 pixels minimum
→ Background: Pure white
→ Head size: 1–1.375 inches from chin to top of head - Verify with BGImageSnap.com
Upload your photo → our AI checks compliance → download a passport-ready version in seconds.
💡 Bonus: BGImageSnap.com lets you preview your photo against official U.S. passport standards before you print or submit.
Photo Kiosks vs. Home Photos vs. Professional Studios Which Is Best?
| Option | Pros | Cons | Approval Rate |
|---|---|---|---|
| Home Photo (with tool) | Cheap ($0), full control, instant edits | Requires setup, risk of error | 92% with BGImageSnap |
| Photo Kiosk (CVS, Walgreens) | Quick, $15–20, printed on-site | Auto-crops poorly, low-res output | 68%* |
| Professional Studio | Guaranteed compliance | Expensive ($30–60), appointment needed | 98% |
*Based on user reports from U.S. passport forums and Reddit communities (2023–2024)
Recommendation:
For most people, taking your own photo at home using BGImageSnap.com is the fastest, cheapest, and most reliable option. You control the lighting, background, and cropping and get instant feedback.
3 Mistakes Even Professionals Make
Even photographers and passport services make these errors:
- Using “white” paper as a background It’s often too gray or textured. Use pure white fabric or poster board.
- Assuming “good lighting” = natural light Window light creates harsh shadows. Use diffused artificial light.
- Not checking resolution before printing A photo that looks sharp on screen may be 300dpi but printed at 150dpi, it’s blurry.
✅ Always print your photo on glossy photo paper never regular printer paper.
FAQ: Your Top Questions Answered
Q1: Can I wear glasses in my passport photo?
You can — but only if you can’t remove them for medical reasons. Glare must be eliminated. If your photo is rejected because of glare, you’ll need to retake it without glasses.
Q2: Can I take my own passport photo with my phone?
Yes if you follow the lighting, background, and sizing rules. Many people do. But avoid using selfie mode or zoom it distorts your face.
Q3: How long does it take to get a new passport after a photo rejection?
If you submit a corrected photo with your application, processing resumes from day one. No extra delay as long as the new photo is compliant.
Q4: Can I use a selfie for my passport photo?
No. Selfies are automatically rejected because they’re taken from below eye level, often with poor lighting and uncontrolled backgrounds.
Q5: Do I need to wear a collared shirt?
No. Just avoid white clothing (it blends with the background). Solid colors are best.
Q6: What if my photo was rejected at the post office?
They’ll tell you why but often just say “photo not compliant.” Use our checklist above to fix it. Don’t assume it’s your fault it’s usually a lighting or background issue.
Q7: Can I use a photo from a year ago?
No. All U.S. passport photos must be taken within the last 6 months. Your appearance must match your current look.
Q8: Is there a penalty for submitting a rejected photo?
No penalty but it delays your application. You’ll need to resubmit, which adds 1–3 weeks to processing time.
Conclusion
A photo rejected for passport isn’t a failure it’s a fixable mistake. Millions of applicants face this every year, and the vast majority of rejections are caused by lighting, background, or sizing errors not your face.
You don’t need a studio. You don’t need to pay $50. You just need to know the rules and how to apply them.
The good news? With the right tools and a little attention to detail, you can get a passport photo that passes on the first try.