Can You Smile in a Passport Photo Ultimate Rules for a Perfect Submission
Table of Contents
Quick Answer / Key Takeaways
USA: No. The US Department of State requires a neutral expression with mouth closed. No smiling even a slight smile.
UK: A natural slight smile is allowed as long as the mouth is closed and teeth are not showing.
Canada: No. Canada requires a neutral expression with mouth closed and no smiling.
The expression must be consistent for facial recognition systems and to prevent misidentification.
If you are unsure take a neutral photo. It is accepted everywhere.
Use a plain white or off white background correct dimensions and good lighting to avoid rejection.
Can You Smile in a Passport Photo? The Short Answer by Country
Rules are set by the issuing authority not by photo booth operators.
USA Passport Photo Smile Rules
The US Department of State is the strictest. The official photo requirements state the facial expression must be neutral mouth closed both eyes open and visible. Smiling is not permitted even if teeth are not showing. The goal is consistency for identity verification.
A neutral expression is the safest choice for US passport visa and Global Entry photos.
UK Passport Photo Smile Rules
UKVI and HM Passport Office allow a natural expression. A slight smile is acceptable provided the mouth remains closed and no teeth are visible. The eyes must be open and the face must be unobstructed.
Canada Passport Photo Smile Rules
Canada requires a neutral expression. The mouth must be closed and no smiling is permitted. The head must be upright and the face fully visible against a plain background.
Why Passport Photo Expressions Are Strictly Regulated
Passport photos are not for social media. They are biometric identifiers. A consistent neutral expression makes automated facial recognition more reliable and ensures a person can be identified over many years. Smiling changes the shape of the cheeks the position of the eyes and the distance between facial features. That variation can cause mismatches at border control. For that reason all three countries prioritize a closed mouth neutral look as the default standard.
What a Compliant Smile Actually Looks Like
There is a difference between a smile and a natural expression.
Acceptable: Lips together, relaxed face, no teeth showing eyes open and natural. This is what the UK accepts as a natural expression.
Not acceptable: Upturned corners of the mouth visible teeth squinted eyes or a broad smile. This will be rejected in the USA and Canada and may be rejected in the UK.
When in doubt think “neutral”. You can look calm and pleasant without smiling.
How to Take a Passport Photo That Will Be Accepted
Choose the right background. Use plain white off white or light grey. BGImageSnap offers a passport background remover and replacement tool to ensure compliance.
Set up even lighting. Avoid shadows on the face and background. Natural window light facing you works well.
Position your face correctly. Head upright full face forward shoulders visible. Keep a neutral expression with mouth closed.
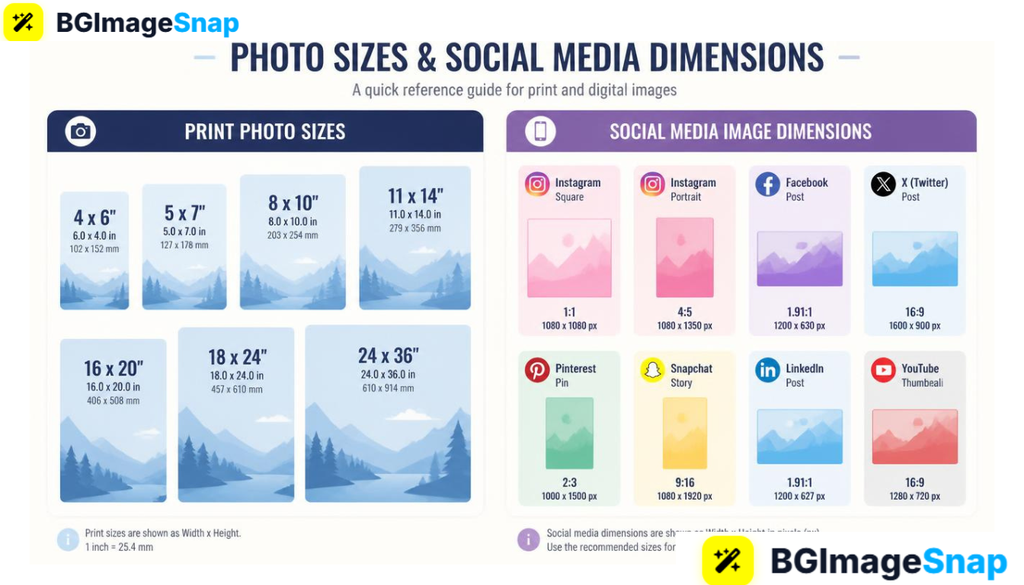
Check technical specs. USA: 2×2 inches 600×600 pixels minimum. UK: 45mm x 35mm. Canada: 50mm x 70mm. No red eyes no filters.
Review before submitting. Check eyes open mouth closed no smile no headwear unless for religious reasons no glasses unless medically required.
If you already have a photo with a slight smile you can use a tool to check compliance before printing. This saves time and postage.
Common Mistakes That Get Photos Rejected
Smiling with teeth showing or mouth open
Squinting or closing one eye
Wearing expressions like frowning or raising eyebrows
Shadows across face or background
Incorrect background color or pattern
Photo too old over 6 months for USA
Head tilted or rotated
Avoiding these issues is easier when you follow the neutral expression rule.
Passport Photo Smile Rules: US vs UK vs Canada Comparison
Requirement
USA
UK
Canada
Smile allowed
No. Neutral only
Yes, slight natural smile mouth closed
No. Neutral only
Mouth
Closed
Closed
Closed
Teeth visible
No
No
No
Expression
Neutral
Natural neutral
Neutral
Background
White or off white
Light coloured plain
White or light coloured, plain
Can you smile in a passport photo in the USA?
No. The US Department of State requires a neutral expression with mouth closed. Any smile will lead to rejection.
Can you smile in a UK passport photo?
A slight natural smile is allowed as long as the mouth stays closed and teeth are not visible. A broad smile is not allowed.
Is a closed mouth smile okay for Canada?
No. Canada requires a neutral expression with no smiling.
Will a small smile get my passport rejected?
In the USA and Canada, yes. In the UK, a very slight smile is usually accepted if the mouth is closed.
How long is a passport photo valid?
The USA recommends photos be less than 6 months old. The UK and Canada also prefer recent photos that reflect your current appearance.
Conclusion
Can you smile in a passport photo? It depends on where you’re applying. For USA and Canada, the answer is no. For the UK, a very slight natural smile is permitted. The safest approach for all three countries is a neutral, closed mouth expression with even lighting and a plain background. Getting the expression right the first time prevents delays and resubmissions.
Baby Passport Photo: The Complete 2026 Guide to Getting It Right the First Time.
Introduction
Getting a baby passport photo right sounds simple until you’re standing in a pharmacy line with a squirming infant who refuses to keep their eyes open. Unlike adult passport photos a baby passport photo has to meet the exact same strict government standards correct size plain background neutral expression no other people in frame but babies can’t sit still hold a pose or follow instructions.
This guide walks you through what a compliant baby passport photo actually requires the most common reasons these photos get rejected and how to take one at home without a professional photographer. You’ll also learn how a free online tool can fix background and sizing issues in seconds if your first attempt isn’t quite passport ready.
Table of Contents
Quick Answer / Key Takeaways
What Makes a Baby Passport Photo Valid
Baby Passport Photo Requirements by Country
How to Take a Baby Passport Photo at Home (Step-by-Step)
Common Mistakes That Get Baby Passport Photos Rejected
Newborn vs. Older Baby: What Changes
Fixing Your Photo Digitally
FAQ
Conclusion
Quick Answer / Key Takeaways
A baby passport photo must show the infant alone eyes open facing forward against a plain white or off white background.
No one may hold or support the baby in a way that’s visible in the frame.
For the US the required size is 2×2 inches with the head measuring 1 to 1⅜ inches from chin to crown.
Newborns are exempt from the “eyes open” rule in the US, UK, and Canada, but the photo must still be taken lying down or in a car seat with a plain background behind the baby.
A photo taken at home with a phone camera is acceptable as long as it meets size lighting and background rules a free photo editing tool can correct backgrounds and cropping afterward.
What Makes a Baby Passport Photo Valid
Every passport issuing authority applies the same core rules to a baby passport photo as it does to an adult one with a few practical adjustments for infants.
A valid baby passport photo generally needs:
A plain white or off white background with no patterns, shadows, or textures
The baby’s face centered and facing the camera not tilted or turned
No other person, hand or object visible in the frame including a parent’s fingers holding the chin
Neutral or naturally relaxed expression smiling isn’t required for infants
No pacifiers, toys, hats, or blankets covering the baby’s face or head
Even natural lighting with no glare, shadows or red eye
Because babies can’t be posed the way adults can most passport agencies allow the photo to be taken while the baby is lying down in a car seat or in a bassinet as long as the background behind them appears plain and unbroken.
Baby Passport Photo Requirements by Country
Country
Photo Size
Background
Eyes Open Rule for Newborns
USA
2 x 2 inches
Plain white/off white
Exempt
UK
45mm x 35mm
Plain cream or light grey
Exempt
Canada
50mm x 70mm
Plain white
Exempt
These are the baseline dimensions most applicants need but always confirm current requirements on your country’s official passport or visa agency website before submitting since specifications are updated periodically.
How to Take a Baby Passport Photo at Home (Step-by-Step)
You don’t need a studio to get a compliant baby passport photo. A phone camera natural light and a plain sheet are usually enough.
Lay a plain white sheet or blanket on a flat surface such as a bed changing table or the floor making sure it’s wrinkle free and extends beyond the camera frame.
Position the baby on their back directly on the white sheet with their head centered in the space where the photo will be cropped.
Use natural indirect daylight a window with soft light works best. Avoid direct sun or flash which creates harsh shadows.
Shoot from directly above holding the phone parallel to the baby so their face isn’t distorted by angle.
Wait for a calm alert moment when the baby’s eyes are open (if age appropriate) and their face is relaxed.
Take several shots in quick succession to increase your chances of one clean frame.
Crop and check proportions so the head size matches your country’s required measurements before printing or uploading.
If a parent’s hand is visible supporting the baby’s head in any shot that photo will need to be cropped tightly or retaken since visible hands are one of the most common reasons a baby passport photo gets rejected.
Common Mistakes That Get Baby Passport Photos Rejected
Visible hands or fingers propping up the baby’s head or chin
Wrinkled or patterned fabric behind the baby instead of a smooth plain surface
Shadows across the face from harsh overhead lighting or flash
Head tilted at an angle rather than facing straight at the camera
Photo taken too close cutting off part of the head, or too far leaving too much empty space
Low resolution or blurry images from moving too quickly while shooting
Incorrect print size or digital dimensions that don’t match the passport office’s exact specifications
Most rejections come down to background and framing issues rather than the baby’s expression which is why reviewing the photo carefully or running it through a background and sizing tool before submission saves a second trip.
Newborn vs. Older Baby: What Changes
A newborn baby passport photo has more flexibility than one for an older infant. Newborns and very young babies are typically allowed to have their eyes closed since keeping a two week old awake and alert on command isn’t realistic. However the same background framing and no other person rules still apply.Once a baby is a few months old and can hold their head up agencies generally expect eyes open and a forward facing pose closer to what’s required for older children and adults. A baby passport photo for a toddler who can sit independently should follow the same standard as an adult photo as closely as possible.
Fixing Your Photo Digitally
Even a well composed baby passport photo taken at home can have an uneven background a slightly off crop or shadows that need correcting. Rather than retaking the entire shoot a background removal and passport photo sizing tool can adjust the image to meet official dimensions and produce a clean uniform white background without professional editing software. This step is especially useful for a baby passport photo since it’s harder to control the background perfectly with a moving infant than with a cooperative adult subject.
FAQs
Does a baby passport photo need the eyes open?
In the US, UK, and Canada, babies under one year old are typically exempt from the eyes open requirement though the photo should still show the face clearly and without obstruction.
Can I hold my baby while taking the passport photo?
You can support your baby just outside the frame but no part of your hand, arm or body should be visible in the final cropped photo.
What background do I need for a baby passport photo?
A plain white or off white background with no shadows, patterns or textures is required by most passport issuing authorities.
Can I use a photo taken on my phone?
Yes, as long as the resolution is high enough and the photo meets the size, background and lighting requirements for your country.
Why do baby passport photos get rejected most often?
Visible hands wrinkled backgrounds, shadows, and incorrect sizing are the leading causes of rejection.
How soon after birth can I get a passport photo taken?
There’s no minimum age a baby passport photo can be taken shortly after birth as long as the requirements for background, framing, and (where applicable) eyes open are met.
Conclusion
A baby passport photo doesn’t require a professional studio but it does require attention to the same details every passport photo needs: a plain background correct framing no visible hands and accurate sizing. Taking the photo at home with natural light and a plain sheet works well for most parents and any background or cropping issues can be corrected afterward without retaking the shoot.
JPEG to ICO: 7 Easy Ways to Convert Images Easily and Correctly.
If you need to turn a regular JPEG image into an icon a JPEG to ICO converter can make the process much easier. JPEG files are designed mainly for photographs and general purpose images while ICO files are commonly used for icons such as website favicons Windows application icons and shortcuts.
In this guide you’ll learn what an ICO file is how to convert JPEG to ICO which image sizes work best common mistakes to avoid and how to prepare an icon that looks sharp across different devices.
Table of Contents
What Is a JPEG to ICO Conversion?
Why Convert JPEG to ICO?
How to Convert JPEG to ICO
Best ICO Sizes to Use
JPEG vs ICO
Common Conversion Mistakes
Tips for Better ICO Icons
FAQ
Conclusion
Quick Answer: How Do You Convert JPEG to ICO?
The easiest way to convert JPEG to ICO is to use an online image converter.
Open a JPEG to ICO conversion tool.
Upload your JPEG image.
Choose ICO as the output format.
Select an appropriate icon size if the tool provides the option.
Convert the image.
Download and test the resulting ICO file.
For a simple website favicon or application icon start with a square source image whenever possible.
What Is a JPEG to ICO Conversion?
A JPEG to ICO conversion changes an image from the .jpg or .jpeg format into an .ico file.
JPEG is a compressed image format that works particularly well for photographs. ICO on the other hand is an icon container format designed to store icon images at different resolutions and color depths.
This difference matters because an icon usually needs to remain recognizable when displayed at a very small size.
For example you might convert a company logo from JPEG to ICO before using it as a favicon or application icon.
Why Convert JPEG to ICO?
There are several practical reasons to convert JPEG images into ICO files.
1. Website Favicons
A favicon is the small icon associated with a website or browser tab. ICO is one of the formats commonly used for favicons.
2. Desktop and Application Icons
Windows applications and shortcuts can use ICO files for their visual icons.
3. Branding
If your logo is available only as a JPEG converting it to ICO can make it more suitable for icon based applications.
4. Better Icon Compatibility
ICO is specifically designed for icon use so it is more appropriate than JPEG when you’re creating an actual icon file.
How to Convert JPEG to ICO Online
Using an online converter is usually the simplest approach.
Step 1: Choose Your JPEG
Select the JPEG image you want to convert. A clean high resolution source will generally produce a better result.
Step 2: Upload the Image
Open a trusted image conversion tool and upload your JPEG.
For example you can use BGImageSnap for image processing tasks on your website: BGImageSnap.
Step 3: Select ICO
Choose ICO as the output format if the converter supports it.
Step 4: Select the Icon Size
If size options are available choose one appropriate for your intended use. A square image is generally easier to adapt into an icon.
Step 5: Convert and Download
Start the conversion and download the resulting ICO file.
Step 6: Test the Icon
Don’t stop after downloading. Open or install the ICO where you intend to use it and check whether the image remains recognizable at its actual display size.
What Is the Best ICO Size?
The best size depends on where the icon will be used.
Common icon dimensions include:
Use Case
Useful Size
Small favicon
16 × 16 px
Standard favicon
32 × 32 px
Larger website/app icon
48 × 48 px
Desktop/application use
256 × 256 px
An ICO file can contain multiple image sizes which can help an icon display appropriately in different contexts.
Practical tip: If your original JPEG is rectangular consider cropping it into a square before conversion. Otherwise the icon may appear stretched or have unwanted empty space.
JPEG vs ICO: What’s the Difference?
Feature
JPEG
ICO
Main purpose
Photos and images
Icons
File extension
.jpg.jpeg
.ico
Compression
Lossy
Can contain different image representations
Typical use
Photography web images
Favicons application icons
Multiple icon sizes
No
Yes
Best for tiny icons
Usually no
Yes
The important point is that converting JPEG to ICO isn’t simply about changing the filename extension. The image needs to be encoded as an actual ICO file.
Common JPEG to ICO Conversion Mistakes
Using a Low Resolution JPEG
A tiny or heavily compressed JPEG can produce a blurry icon.
Solution: Start with the highest quality source available.
Keeping a Complex Background
Detailed photographs often become difficult to recognize at 16 × 16 or 32 × 32 pixels.
Solution: Use a simple subject with strong contrast.
Ignoring the Aspect Ratio
A wide JPEG may not work well as a square icon.
Solution: Crop or resize the image before conversion.
Using Too Much Detail
Small icons have limited visual space. Fine text and complicated patterns can disappear.
Solution: Simplify the design and prioritize the main visual element.
Not Testing the Final Icon
An icon may look good at full size but become unclear when displayed at a small size.
Solution: Test the converted ICO at the actual size where you’ll use it.
Tips for Creating a Better ICO Icon
Use a clear high quality source image.
Prefer square dimensions.
Keep the main subject centered.
Use strong contrast.
Avoid tiny text.
Remove unnecessary visual details.
Check the icon at multiple sizes.
Keep an original copy of your JPEG before conversion.
Visual opportunity: Add a simple before and after infographic showing a JPEG logo on the left and the same logo as an ICO icon at 16 px 32 px and 256 px.
Frequently Asked Questions
Can I convert JPEG to ICO without installing software?
Yes. Online image converters can perform the conversion directly in a browser so desktop software isn’t necessarily required.
Can a JPEG be used as a favicon?
JPEG can be used in some modern browser contexts but ICO remains a common and practical choice for traditional favicon support.
Does converting JPEG to ICO improve image quality?
No. Changing the format doesn’t magically improve the original image. A poor quality JPEG will generally produce a poor quality icon.
What size should I use for a favicon?
A 32 × 32 pixel version is a useful starting point while 16 × 16 is another common favicon size. Supporting multiple sizes can be helpful when the format and implementation allow it.
Can I convert a logo from JPEG to ICO?
Yes. A logo can be converted to ICO but it should ideally be simple square and recognizable at small dimensions.
Why does my ICO look blurry?
The original JPEG may be too small or highly compressed or the image may contain details that don’t survive at icon size. Start with a higher quality source and simplify the design if necessary.
Conclusion
Converting JPEG to ICO is useful when you need to turn an existing image or logo into an icon for a website application shortcut or other interface.
For the best result begin with a high quality image use a square composition select an appropriate icon size and test the final ICO at its intended display size. Most importantly remember that a good icon needs to remain recognizable even when it becomes very small.
If you’re working with images for your website or other digital projects BGImageSnap can be part of your broader image processing workflow.
Ready to Work With Your Image?
Convert and prepare your image with BGImageSnap and create cleaner visuals for your digital projects. Try BGImageSnap
How to Resize an Image to 500×500 Image Size in Seconds Free Guide.
Introduction
If a website marketplace or app has ever rejected your photo for being the wrong dimensions you’ve likely run into the 500×500 image size requirement. This square format is one of the most common upload standards on the web used for profile pictures, product thumbnails, app icons and social media avatars and getting it wrong usually means a blurry, stretched, or cropped result.
This guide explains exactly what a 500×500 image size is where it’s required and how to resize any photo to it correctly without losing quality or distorting the subject. You’ll also learn the difference between resizing and cropping common mistakes to avoid and a free step-by-step method you can use right now.
Table of Contents
Quick Answer
What Does 500×500 Image Size Mean?
Where Is a 500×500 Image Size Required?
Resizing vs. Cropping: What’s the Difference?
How to Resize an Image to 500×500 Pixels (Step-by-Step)
Common Mistakes When Resizing to 500×500
Tips for Keeping Image Quality Sharp
Visual Opportunities
FAQ
Conclusion
Quick Answer / Key Takeaways
A 500×500 image size means an image that is exactly 500 pixels wide and 500 pixels tall a perfect square.
It’s commonly required for profile photos, product images, app icons and marketplace listings eBay, Etsy, Shopify, etc.
The safest way to resize is to crop to a square first then scale to 500×500, rather than stretching a rectangular photo directly.
Free browser based tools can do this in seconds without installing software.
What Does 500×500 Image Size Mean?
A 500×500 image size refers to an image’s pixel dimensions 500 pixels across and 500 pixels down. Because both numbers are equal the image is a square regardless of the file format (JPG, PNG, or WebP).
This differs from resolution or file size. Two images can both be 500×500 pixels but have very different file sizes (in KB or MB) depending on compression. When a platform asks for a 500×500 image it is almost always referring to pixel dimensions not file weight.
Where Is a 500×500 Image Size Required?
Many platforms specify square image formats close to or exactly at 500×500 pixels including:
E-commerce product photos Shopify, Etsy, and Amazon listings often recommend square thumbnails for consistent grid layouts.
Profile and avatar pictures many apps and forums request square uploads that get automatically cropped if the wrong shape is submitted.
App icons and favicons square dimensions are the standard starting point before platform-specific resizing.
Social media profile photos most platforms display profile images as circles or squares cropped from a square source.
Because requirements vary slightly by platform it’s worth checking the exact specification before uploading but resizing to a clean 500×500 image size is a safe baseline for most square image requirements.
Resizing vs. Cropping: What’s the Difference?
These two actions are often confused but they do different jobs:
Resizing changes the pixel dimensions of the whole image scaling everything down or up proportionally.
Cropping removes parts of the image to change its shape without necessarily changing the remaining resolution.
If your original photo isn’t already square resizing it directly to 500×500 will stretch or squash the image distorting faces, logos, or products. The correct approach for a clean 500×500 image size is:
Crop the image to a 1:1 (square) aspect ratio first keeping the important subject centered.
Resize the cropped square to exactly 500×500 pixels.
This two step process preserves proportions and avoids the “stretched photo” look.
How to Resize an Image to 500×500 Pixels (Step-by-Step)
Crop to a square if your photo isn’t already 1:1 centering the subject you want to keep.
Set the output dimensions to 500 pixels wide by 500 pixels tall.
Choose your file format JPG for photos PNG for images needing transparency.
Download the resized file and check that it displays correctly at 500×500 before uploading it to your platform.
This process works the same whether you’re preparing one image or several batch resizing tools can apply the same 500×500 image size to multiple files at once.
Common Mistakes When Resizing to 500×500
Stretching a rectangular photo directly to 500×500 instead of cropping first which distorts the subject.
Ignoring the background especially for product photos where a busy or uneven background looks worse once cropped tightly.
Over compressing the file which can make a 500×500 image size look blurry or pixelated even though the dimensions are correct.
Not checking the platform’s actual requirement some sites want 500×500 exactly while others accept a minimum size and crop automatically.
Tips for Keeping Image Quality Sharp
Start with a source image that’s equal to or larger than 500×500 pixels; enlarging a small image will reduce sharpness.
Keep the subject centered before cropping since square crops remove the sides or top/bottom of a rectangular photo.
Use PNG format if the image needs a transparent background (common for logos and product cutouts).
Preview the final 500×500 version at actual size before publishing since small distortions are easier to spot at full scale.
Visual Opportunities
Before/after diagram: a rectangular photo next to its correctly cropped and resized 500×500 version.
Comparison table: platforms and their typical square image requirements (for editorial reference verified against each platform’s current guidelines before publishing).
Step screenshots: the upload, crop, and resize steps within the tool interface.
Helps readers reduce file size after resizing without losing the 500×500 dimensions
FAQs
Is 500×500 pixels a good image size for a website?
Yes for square format uses like thumbnails avatars and product grids 500×500 image size is a solid balance between visual clarity and file weight on most modern displays.
Will resizing to 500×500 reduce my image quality?
Reducing a larger image down to 500×500 pixels generally preserves quality well. Enlarging a smaller image up to 500×500 is more likely to introduce blurriness.
What file format should I use for a 500×500 image?
Use JPG for photographs where small file size matters and PNG when you need a transparent background such as for logos or product cutouts.
Can I resize multiple images to 500×500 at once?
Yes many free online tools support batch resizing letting you apply the same 500×500 image size to a whole folder of photos at once.
Do I need design software to resize an image to 500×500?
No. Free browser based resizers can crop and resize images to 500×500 pixels without installing any software.
Is 500×500 the same as a “square image”?
500×500 is one specific square size. Any image where width and height are equal is square but not every square image measures exactly 500×500 pixels.
Conclusion
A 500×500 image size is one of the most widely used square formats across e-commerce social platforms and app stores and getting it right is mostly about avoiding one mistake: resizing a rectangular photo directly instead of cropping it to a square first. Following the crop then resize approach above will give you a clean undistorted 500×500 image ready for upload on almost any platform.
Convert Pixels to Inches: The Ultimate Free Guide (2026).
Introduction
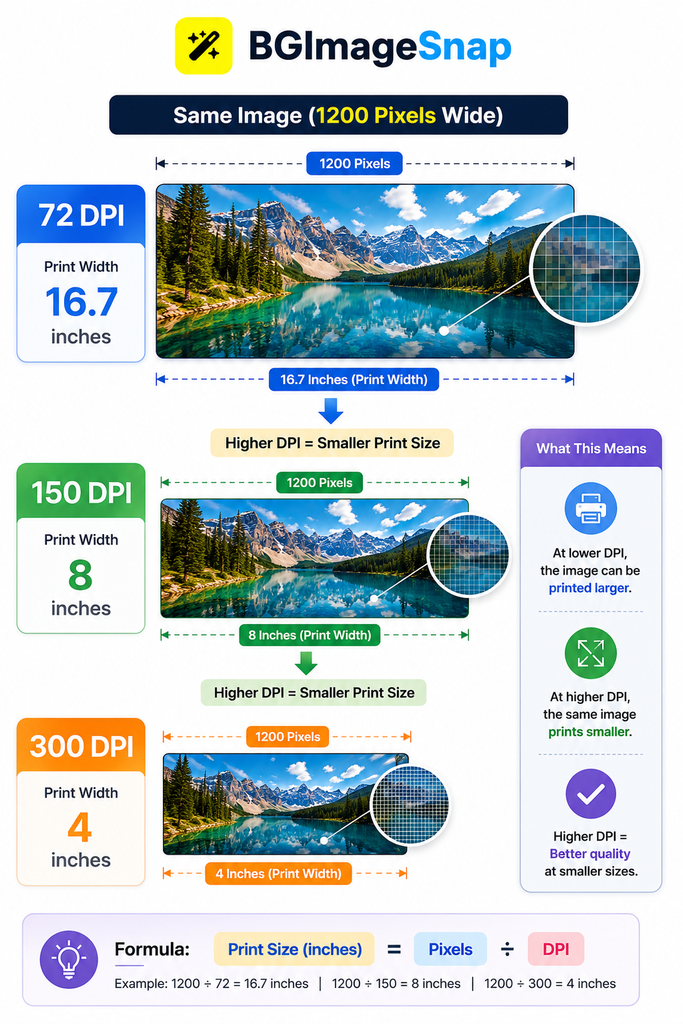
If you’ve ever tried to print a photo and watched it come out blurry or resized a graphic for a client only to have them ask “but what size is this in inches?” you already know why it matters to convert pixels to inches correctly. Pixels measure screen resolution while inches measure physical real world size. The two only connect once you know your image’s DPI (dots per inch) or PPI (pixels per inch).
In this guide you’ll learn exactly how to convert pixels to inches the formulas behind it common DPI standards for web and print a free way to do the conversion instantly and the mistakes that quietly ruin print quality.
Table of Contents
Quick Answer
Pixels vs. Inches: What’s the Difference?
The Pixels to Inches Formula
Common DPI Standards (Web vs. Print)
Step-by-Step: How to Convert Pixels to Inches
Pixel to Inch Conversion Chart
How to Convert Pixels to Inches Without Software
Common Mistakes to Avoid
FAQ
Conclusion
Quick Answer / Key Takeaways
Formula: Inches = Pixels ÷ DPI (or PPI)
Web images typically use 72–96 DPI; print images need 300 DPI for sharp results.
A 1200 × 1800 px image at 300 DPI equals 4 × 6 inches a standard photo print size.
The same pixel dimensions can represent different physical sizes depending on the DPI setting.
You can convert pixels to inches instantly using a browser based tool without installing software.
Pixels vs. Inches: What’s the Difference?
A pixel is a single point of color in a digital image a unit of screen resolution not physical size. An inch is a fixed unit of physical measurement. A 1000 pixel wide image can be tiny or huge in the real world; it all depends on how many pixels are packed into each inch.
That’s where DPI (dots per inch) and PPI (pixels per inch) come in. These values tell you the density of pixels within a printed inch and they’re the bridge between the digital and physical worlds.
The Pixels to Inches Formula
The core formula to convert pixels to inches is:
Inches = Pixels ÷ DPI
For example, an image that is 1500 pixels wide at 150 DPI equals:
1500 ÷ 150 = 10 inches
To go the other way and find pixels from inches:
Pixels = Inches × DPI
This formula is used for both width and height calculate each dimension separately.
Common DPI Standards (Web vs. Print)
Not every image uses the same DPI and this is the single biggest source of confusion when people convert pixels to inches.
Use Case
Typical DPI/PPI
Notes
Website & social media images
72–96 DPI
Screens display pixels directly; DPI is mostly irrelevant on screen
Standard document printing
150 DPI
Acceptable quality for everyday printing
Professional photo printing
300 DPI
Industry standard for sharp, print ready photos
Large format banners/posters
100–150 DPI
Viewed from a distance so lower DPI still looks sharp
Why this matters: the same 1200 × 1800 pixel file is roughly 12.5 × 18.75 inches at 96 DPI (screen) but only 4 × 6 inches at 300 DPI (print). Same pixels completely different physical size.
Step-by-Step: How to Convert Pixels to Inches
Find your image’s pixel dimensions. Right click the file and check “Properties” (Windows) or “Get Info” (Mac) or open it in any image editor.
Determine the DPI you need. Use 300 DPI for print 72–96 DPI for web/screen display.
Divide width in pixels by DPI. This gives you the width in inches.
Divide height in pixels by DPI. This gives you the height in inches.
Round to a practical print size if you’re ordering physical prints (e.g., 4×6, 5×7, 8×10).
Pixel to Inch Conversion Chart
Pixels (W × H)
At 72 DPI
At 150 DPI
At 300 DPI
600 × 400
8.3 × 5.6 in
4 × 2.7 in
2 × 1.3 in
1200 × 1800
16.7 × 25 in
8 × 12 in
4 × 6 in
1500 × 2100
20.8 × 29.2 in
10 × 14 in
5 × 7 in
2400 × 3000
33.3 × 41.7 in
16 × 20 in
8 × 10 in
How to Convert Pixels to Inches Without Software
You don’t need Photoshop or a desktop program just to convert pixels to inches. A browser based image resizer lets you upload a photo see its pixel dimensions set your target DPI and get the inch measurements and a print ready file in seconds right from your phone or laptop. This is especially useful when you’re preparing images for printing, passport photos, or ID cards and need an exact physical size without guessing.
Common Mistakes to Avoid
Assuming DPI is fixed. The same pixel file can be resized to any DPI; always check before printing.
Using web images for print. A 72 DPI image that looks fine on screen will print blurry or pixelated.
Ignoring the aspect ratio. Converting only one dimension without the other can distort the image.
Confusing DPI with PPI. PPI refers to image resolution; DPI technically refers to printer output but the two are used interchangeably in most conversions.
Upscaling low resolution images. Increasing DPI on a small pixel file doesn’t add real detail; it just stretches existing pixels.
FAQs
1. How do I convert pixels to inches for printing?
Divide the pixel width and height by 300 (the standard print DPI). For example, 1800 × 2400 pixels at 300 DPI equals 6 × 8 inches.
2. What DPI should I use to convert pixels to inches for a website?
Web images generally use 72–96 DPI since screens display pixels directly rather than printed dots.
3. How many pixels are in an inch?
It depends on the DPI setting. At 300 DPI there are 300 pixels per inch. At 72 DPI there are 72 pixels per inch.
4. Can I convert pixels to inches without knowing the DPI?
No DPI (or PPI) is required to convert pixels to inches since pixels alone only describe resolution not physical size.
5. What is 1080 x 1080 pixels in inches?
At 72 DPI that’s 15 × 15 inches. At 300 DPI (print quality) it’s 3.6 × 3.6 inches.
7. Is PPI the same as DPI?
Not technically PPI measures pixel density in a digital image while DPI measures dots printed per inch by a printer. In everyday conversion they’re used interchangeably.
Conclusion
Converting pixels to inches comes down to one simple formula divide pixels by DPI but getting it right depends on knowing which DPI standard your project needs. Use 72–96 DPI for anything staying on a screen and 300 DPI whenever an image is headed to print. Once you understand that relationship you’ll never be caught off guard by a blurry print or an oddly sized graphic again.
MP4 to PNG: How to Convert MP4 Videos to PNG Images
Table of Contents
What Is MP4 to PNG Conversion?
Can You Convert an Entire MP4 into PNG?
How to Convert MP4 to PNG
How to Extract PNG Images from MP4
MP4 to PNG vs MP4 to JPG
How to Choose the Right Video Frame
Tips for Better MP4 to PNG Results
Common MP4 to PNG Problems
When Should You Convert MP4 to PNG?
Using PNG Frames for Background Removal
Frequently Asked Questions
Conclusion
What Is MP4 to PNG Conversion?
MP4 to PNG conversion means taking still frames from an MP4 video and saving those frames as PNG image files.
An MP4 contains a sequence of images that are displayed rapidly to create motion. When you extract a frame, you are essentially selecting one of those individual images.
For example, imagine you have a 30 second MP4 video and want to save a picture that appears at the 12 second mark. Instead of taking a basic screenshot, an MP4 to PNG converter can extract the selected video frame and save it as a PNG file.
PNG is particularly useful when you want a high quality image for editing, design, graphics, or further processing.
Can You Convert an Entire MP4 into PNG?
Not in the same way that you convert one image format into another.
An MP4 is a video containing many frames, while PNG is an image format containing a single still image.
Therefore, when people search for an MP4 to PNG converter, they usually mean one of these things:
Extract One PNG Frame
You select a specific moment in the video and save that frame as a PNG image.
Extract Multiple PNG Frames
You select several moments from the video and save each selected frame as a separate PNG file.
Convert Every Video Frame to PNG
You can technically extract every frame from a video and save each one as a PNG. However, this can create a very large number of image files.
For most users, extracting selected frames is more practical.
How to Convert MP4 to PNG
The easiest method depends on what you need from the video.
Step 1: Choose Your MP4 Video
Start with the MP4 file that contains the image or scene you want to extract.
Make sure you have access to the original video whenever possible. A higher quality source generally produces a better extracted frame.
Step 2: Open an MP4 to PNG Converter
Use a suitable video conversion or frame extraction tool that supports MP4 input and PNG output.
Upload your video and wait for it to load.
Step 3: Select the Frame
Move through the video until you reach the exact moment you want to capture.
If the tool provides frame selection controls, use them to find the most suitable frame.
Step 4: Select PNG as the Output Format
Choose PNG as the output format.
PNG can be a useful choice when image quality and further editing are important.
Step 5: Export the Image
Start the conversion or frame extraction process.
The selected frame should be saved as a PNG image that you can use for editing, sharing, designing, or other projects.
How to Extract PNG Images from MP4
If you need several images rather than one frame, you can extract multiple frames from the same video.
For example, suppose you have a product demonstration video. You might want images showing:
Product Introduction
Extract a frame where the product is clearly visible.
Main Product Feature
Choose a frame that clearly demonstrates an important feature.
Final Product View
Extract a clean frame showing the complete product.
This approach allows you to create a collection of PNG images from a single MP4 video.
MP4 to PNG vs MP4 to JPG
Both PNG and JPG can be used for extracted video frames, but they serve different purposes.
Feature
PNG
JPG
Image quality
High
Good
Compression
Usually lossless
Lossy
Transparency support
Yes
No
File size
Usually larger
Usually smaller
Editing
Excellent for graphics
Good for photographs
Best use
Graphics and editing
Photos and web images
If you need an extracted frame for further editing or graphic design, PNG can be a better choice.
If you mainly want a smaller image file for general sharing, JPG may be more practical.
How to Choose the Right Video Frame
Extracting a PNG does not automatically make the image perfect. The quality of the original video and the selected frame both matter.
Look for Sharp Frames
Avoid frames where the subject is moving quickly or appears blurry.
Avoid Transition Frames
Video transitions can contain partial objects, fading effects, or motion artifacts.
Check the Lighting
Choose a frame with clear lighting and good visibility.
Look for a Clean Composition
If the image will be used for a website, thumbnail, product image, or social media post, choose a frame with a clear subject and useful composition.
Tips for Better MP4 to PNG Results
Use the Highest Quality MP4 Available
A high quality source video gives you a better starting point for frame extraction.
Select the Exact Moment
Small changes between frames can make a major difference, especially when a person, product, or object is moving.
Avoid Highly Compressed Videos
If the MP4 has already been heavily compressed, the extracted PNG cannot restore details that were removed from the original video.
Choose PNG When Editing Matters
PNG is useful when you plan to edit the extracted image or use it in graphic design.
Keep the Original Video
Always keep a copy of the original MP4. You may want to extract a different frame later.
Common MP4 to PNG Problems
The PNG Looks Blurry
The selected frame may contain motion blur, or the original video may have low resolution.
Solution: Try another frame and use the highest quality source video available.
The PNG File Is Too Large
PNG files can be considerably larger than compressed JPG images.
Solution: If file size is more important than lossless quality, consider JPG instead.
The Extracted Image Has Black Bars
Some videos use different aspect ratios from the display area. This can result in black bars around the video.
Solution: Crop the extracted image after conversion if the bars are not needed.
The Image Has Low Resolution
Extracting a frame does not increase the original video’s resolution.
Solution: Use a higher resolution source video whenever possible. An image enhancement tool can also be considered when appropriate, but it cannot recreate every detail perfectly.
The Wrong Frame Was Extracted
You may have selected a nearby frame instead of the exact moment you wanted.
Solution: Move through the video frame by frame when the converter provides that option.
When Should You Convert MP4 to PNG?
There are many practical situations where extracting PNG images from an MP4 makes sense.
Creating Video Thumbnails
You can select a strong frame from a video and use it as a thumbnail.
Saving Important Moments
If a video contains an important scene, you can save it as a still image.
Product Photography
A product demonstration video may contain useful product views that can be extracted as images.
Social Media Content
Selected video frames can be used as supporting graphics for social media posts.
Design Projects
PNG frames can be imported into graphic design and image editing software.
Creating Reference Images
Designers can extract useful visual references from existing video content.
Using PNG Frames for Background Removal
If your goal is related to background removal, extracting a PNG frame from an MP4 can be a useful first step.
For example, you may have a video of a person, product, object, or other subject. First, extract the clearest frame from the MP4 and save it as PNG. You can then use a background remover to isolate the subject from its original background.
BGImageSnap can be useful when you want to continue editing an extracted image after converting it from video.
Recommended Workflow
Select a high quality MP4.
Find the clearest frame.
Extract the frame as PNG.
Remove the background if needed.
Edit or enhance the resulting image.
Export the final image for your intended use.
This workflow is particularly useful for product graphics, social media designs, thumbnails, and creative projects.
BGImageSnap for Image Editing
Once you have extracted a PNG frame, you may want to edit it further.
BGImageSnap is designed around image tools and creative workflows, making it useful when your extracted frame needs additional editing.
Try BGImageSnap
If you have an MP4 video and need a still PNG image, start by extracting the frame you need. If the resulting image also needs background removal or other image editing, continue the workflow with the appropriate BGImageSnap tool.
The goal is simple: extract the useful visual from your video and turn it into an image you can actually use.
Image Suggestions for This Article
MP4 to PNG Conversion Interface
Purpose: Show users what a video to image conversion workflow looks like.
Recommended placement: Near the section explaining how to convert MP4 to PNG.
SEO filename:mp4 to png converter interface.png
Alt text: MP4 to PNG converter interface for extracting video frames
Selecting a Video Frame
Purpose: Demonstrate how users can choose a specific moment from an MP4 video.
Recommended placement: Under the frame selection instructions.
SEO filename:select frame from mp4 video.png
Alt text: Selecting a frame from an MP4 video for PNG extraction
Extracted PNG Result
Purpose: Show the final PNG image after frame extraction.
Recommended placement: After the conversion steps.
SEO filename:extracted png from mp4.png
Alt text: PNG image extracted from an MP4 video frame
Background Removal Workflow
Purpose: Explain how an extracted PNG can be used for background removal.
Recommended placement: In the background removal section.
SEO filename:png background removal workflow.png
Alt text: PNG frame prepared for background removal
Frequently Asked Questions
Can I convert MP4 to PNG?
Yes. Instead of converting the entire video into one PNG file, the usual process is to extract one or more frames from the MP4 and save them as PNG images.
What is an MP4 to PNG converter?
An MP4 to PNG converter or frame extraction tool takes a video file and allows you to save selected video frames as PNG images.
Can I extract multiple PNG images from one MP4?
Yes. You can extract multiple selected frames from the same video. Some tools may also allow you to extract frames at regular intervals.
Can I convert every frame of an MP4 to PNG?
Technically, yes. Every video contains individual frames that can be extracted as images. However, a video can contain thousands of frames, so converting every frame may create a very large collection of PNG files.
Is PNG better than JPG for extracted video frames?
It depends on your purpose. PNG is generally better when you want lossless image storage or plan to edit the image. JPG is often more convenient when you need smaller file sizes.
Does converting MP4 to PNG improve image quality?
No. Extracting a frame does not add detail that was not present in the original video. The final image quality depends heavily on the video’s resolution, compression, lighting, and the selected frame.
Can I use an extracted PNG for background removal?
Yes. An extracted PNG can be used as the starting image for background removal. Choose a frame where the subject is sharp and clearly separated from the background for better results.
What is the best frame to extract from a video?
The best frame is usually sharp, well lit, free from motion blur, and clearly shows the subject. For people or moving objects, checking several nearby frames can help you find the cleanest result.
Conclusion
Converting MP4 to PNG is essentially the process of extracting still images from a video. Whether you need one important frame, several images, or a visual for a creative project, frame extraction provides a simple way to turn video content into usable PNG images.
For the best results, start with a high quality MP4, select a sharp frame, and choose PNG when you need a high quality image for editing or further processing.
If your extracted frame also needs background removal or image editing, you can continue the workflow with BGImageSnap and turn a simple video frame into a polished visual ready for your project.
1920×1080 Background Images: 7 Free Ways to Download Stunning HD Wallpapers.
Introduction
1920×1080 background images are the standard for Full HD screens desktops laptops and most monitors sold today. If you’ve ever downloaded a wallpaper that looked blurry, stretched, or cropped oddly it’s usually because the image wasn’t sized correctly for your display.
This guide covers where to find free high quality 1920×1080 background images how to confirm an image is actually the right resolution before downloading and how to resize or clean up an image yourself if you already have one that’s close but not quite right.
1920×1080 background images match Full HD resolution the most common screen size for desktops and laptops.
Free legal sources include Unsplash, Pexels, and Pixabay, which offer images specifically filterable by resolution.
Always check the actual pixel dimensions before downloading thumbnails can be misleading.
If an image is close to 1920×1080 but not exact you can resize or crop it yourself in a few steps.
Avoid upscaling small images to fit 1920×1080 it usually results in a blurry lower quality wallpaper.
Why 1920×1080 Is the Standard Resolution
1920×1080 pixels also known as Full HD or 1080p is the most widely used screen resolution for monitors, laptops, and TVs. Using an image at this exact size means:
No stretching or distortion when set as a wallpaper
No visible cropping from the display auto resizing the image
Sharp detail without pixelation since the image matches your screen’s native pixel count
If your monitor uses a different resolution (like 2560×1440 or a 4K display) a 1920×1080 image will still work but may appear slightly less sharp when scaled up.
Best Free Sources for 1920×1080 Background Images
Here are reliable free platforms where you can search directly for background images at this resolution:
Tip: On most of these platforms you can filter search results by orientation (landscape) and sort by resolution to find true 1920×1080 or larger images then downsize if needed.
Always check the specific license terms on the download page most allow free commercial use but some require attribution.
How to Confirm an Image Is Actually 1920×1080
Thumbnails don’t always reflect the real file size. Before setting an image as your wallpaper:
Download the full resolution version not a preview or thumbnail.
Right click the file (on Windows) or use “Get Info” (on Mac) to check its pixel dimensions.
Compare it to 1920×1080. If it’s larger you can crop it down. If it’s smaller avoid stretching it.
Check the aspect ratio. 1920×1080 is a 16:9 ratio an image with a different ratio will need cropping not just resizing.
How to Resize Any Image to 1920×1080
If you already have an image that’s close but not an exact match here’s how to fix it:
Open the image in a free tool like Photopea Canva or GIMP.
Set the canvas size to 1920×1080 pixels.
Crop or reposition the image so the important part of the photo stays visible.
Avoid enlarging small images beyond their original size this causes blurring.
Export as JPEG or PNG at full quality for the sharpest result.
For a faster option a tool like BGimageSnap can handle resizing and background cleanup in one step without needing separate editing software.
Common Mistakes When Downloading Wallpapers
Downloading the preview instead of the full size file many sites show a small preview by default.
Upscaling a low resolution image to fit 1920×1080 which reduces sharpness.
Ignoring aspect ratio leading to stretched or distorted images.
Using copyrighted images without checking the license even if they appear on a “free” site.
FAQ
1. What does 1920×1080 mean exactly? It refers to an image’s pixel dimensions 1920 pixels wide by 1080 pixels tall matching Full HD screen resolution.
2. Are 1920×1080 background images free to use? Many are especially from platforms like Unsplash, Pexels, and Pixabay, but always check the specific license before commercial use.
3. Can I use a 4K image as a 1920×1080 wallpaper? Yes. A larger image can be downsized to 1920×1080 without quality loss since you’re removing pixels rather than adding them.
4. Why does my wallpaper look blurry even though it says 1920×1080? The file may have been upscaled from a smaller original or your monitor’s actual resolution may be higher than 1080p.
5. What’s the difference between 1920×1080 and 1080p? They refer to the same resolution 1080p is the common shorthand for 1920×1080 Full HD.
6. Do I need to credit the photographer for free background images? It depends on the platform’s license. Some allow free use without attribution; others request credit. Always check the source page.
7. What’s the best file format for a 1920×1080 wallpaper? JPEG works well for photos and keeps file size reasonable PNG is better if the image has transparency or sharp graphic elements.
Conclusion
Finding the right 1920×1080 background images comes down to using reliable free sources confirming the actual resolution before downloading and resizing correctly if needed rather than stretching a smaller image. Following these steps means your wallpaper will look sharp and properly fitted not blurry or cropped.
Need to resize or clean up a background image quickly? Try BGimageSnap for fast no fuss image editing and export.
A low quality image maker is exactly what it sounds like: a tool that intentionally reduces a photo’s resolution sharpness or file size. That might sound backwards in a world obsessed with 4K everything but there are real practical reasons people search for this faster website loading smaller email attachments, retro aesthetics, meme culture, or testing how a design performs under poor conditions.
This guide walks through the best free tools for deliberately lowering image quality how to do it step by step and since quality often needs to go both directions how to make high quality images when that’s the actual goal. By the end you’ll know exactly which approach fits your project.
A low quality image maker reduces resolution compression quality or sharpness either for smaller file sizes or a deliberate degraded look.
Common use cases include faster page load times, retro/glitch aesthetics, meme formatting, and file-size limits for email or forms.
Free browser-based tools can do this in seconds without installing software.
If your real goal is the opposite sharper cleaner images the process is different and covered later in this guide.
Always keep an original high-resolution copy before compressing or degrading an image.
What Is a Low Quality Image Maker?
A low quality image maker is any tool web app, plugin, or software feature that lets you reduce an image’s visual fidelity on purpose. This usually happens through one or more of these methods:
Lowering resolution (reducing pixel dimensions e.g., 4000×3000 down to 800×600)
Increasing compression (higher JPEG compression ratio more visible artifacts)
Reducing bit depth or color palette (fewer colors banding effects)
Adding pixelation or blur filters for a stylized low-res look
Unlike a photo editor that focuses on enhancement a low quality image maker focuses on controlled degradation shrinking the file while keeping the image usable for its intended purpose.
Why Would Anyone Want Lower Image Quality?
It’s a fair question. Here are the most common legitimate reasons:
Web performance: Smaller images load faster which improves Core Web Vitals and user experience.
Storage and bandwidth limits: Forms email attachments and some CMS platforms cap file size.
Retro or vaporwave aesthetics: Pixelated low-fidelity visuals are a deliberate creative choice in design and social content.
Placeholder or draft assets: Designers often use low-res placeholders before final assets are ready.
Testing and QA: Developers test how apps or sites handle poor-quality or slow-loading images.
Best Free Low Quality Image Maker Tools
Below are widely used free tools that can reduce image quality quickly. None of these require design experience.
Tip: For batch jobs (multiple images at once) TinyPNG or Squoosh are the fastest options. For creative pixelation effects GIMP or Photopea give more control.
How to Use a Low Quality Image Maker (Step-by-Step)
Upload your original image to the tool of choice. Always keep a backup of the original file.
Choose a compression level or quality percentage. Most tools use a slider (e.g., 100% = original quality, 20% = heavily compressed).
Adjust resolution if needed. Reduce pixel dimensions for a smaller blurrier result.
Preview the result. Compare file size versus visible quality loss before exporting.
Export and download the new lower-quality image.
Test it in context on your website in an email or wherever it will be used to confirm it meets your size or aesthetic goal.
How to Make High Quality Images Instead
If you landed here needing the opposite result here’s how to make high quality images that look sharp and professional:
Start with the highest-resolution source available. You can’t add detail that isn’t there.
Use lossless or minimal compression (PNG or high-quality JPEG/WebP settings).
Avoid repeated re-saving, which compounds compression artifacts over time.
Use upscaling tools carefully. AI upscalers can improve resolution, but results vary depending on the original image.
Match the export format to the use case WebP for web speed without major quality loss, PNG for graphics with transparency, JPEG for photos.
For background-specific edits, image retouching, and export at full resolution a purpose-built platform like BGimageSnap simplifies this without needing separate compression and enhancement tools.
Common Mistakes to Avoid
Overwriting the original file. Once compressed heavily quality can’t be fully restored.
Compressing too aggressively for the use case. A blog thumbnail can handle more compression than a print-ready photo.
Ignoring format differences. PNG and JPEG compress very differently; using the wrong one wastes file size or quality.
Skipping a final preview before publishing or sending the image.
FAQ
1. What does a low quality image maker actually change in a file? It typically reduces pixel resolution increases compression or lowers color depth all of which shrink file size at the cost of visual detail.
2. Is lowering image quality the same as reducing file size? Not always. File size can also be reduced without visible quality loss using efficient formats like WebP or lossless compression.
3. Can I undo image compression later? No. Once detail is compressed away it can’t be fully recovered. Always keep the original file.
4. What’s the best format for small file size with decent quality? WebP generally offers smaller file sizes than JPEG or PNG at similar visual quality making it popular for web use.
5. Why would a business want a low quality image maker? Mainly for speed smaller images improve page load times which affects both user experience and search rankings.
6. Do these tools work on mobile? Most browser-based tools like Squoosh and TinyPNG work on mobile browsers though desktop offers more precise control.
7. How do I make high quality images if I only have a low-res source? Use an AI upscaling tool as a starting point but expect limitations no tool can perfectly reconstruct detail that was never captured.
Conclusion
Whether you need a low quality image maker for faster load times a stylized aesthetic or file-size limits the tools and steps above cover the most common scenarios. And if your actual goal is the reverse producing sharp high quality images the same principles of resolution compression and format choice apply just in the opposite direction.
Ready to edit or optimize your images the easy way? Try BGimageSnap for fast no-fuss image editing and export.
How to Convert File Content Online: The Complete Easy Guide 2026.
File Content Conversion.
If you have ever tried to upload a photo to a website and been told the format is not supported or opened a file only to find it looks nothing like it did before you already understand the problem this article solves. File content conversion is the process of changing a file from one format into another while keeping the content itself intact. For most people that means turning an image document or media file into a format that actually works with the tool, platform, or device they are using.
This guide focuses specifically on image file content conversion since that is where most everyday frustration happens: product photos that will not upload to a marketplace a PNG that needs to become a JPG for email or a screenshot that needs to shrink down into a WebP file for a faster website. You will learn what file conversion actually does behind the scenes when you need it how to do it correctly without ruining quality and which mistakes to avoid.
What File Content Conversion Actually Means
Every digital file is built around a specific format and that format is really just a set of rules for how the content inside is stored. A JPG stores image data using compression that shrinks file size but discards some detail. A PNG stores image data without that loss which is why it supports transparency and sharp edges. A WebP file tries to give you the best of both smaller size with reasonably good quality which is why so many websites now prefer it.
When you convert a file you are not just renaming it. A program reads the original file structure interprets the content, and rebuilds it using the rules of the new format. Done correctly the visible content stays the same. Done poorly using the wrong tool or the wrong settings you can lose transparency, introduce blurriness, or end up with a file that is far larger than it needs to be.
Why People Search for File Conversion Tools
Search intent behind file conversion queries almost always falls into one of a few practical problems. Understanding which one applies to you will help you choose the right approach.
A Platform Will Not Accept the File
Online stores government portals, print services, and social platforms often restrict uploads to specific formats. A product photo saved as a HEIC file from an iPhone for example, will not upload to many e-commerce platforms until it is converted to JPG or PNG.
The File Is Too Large
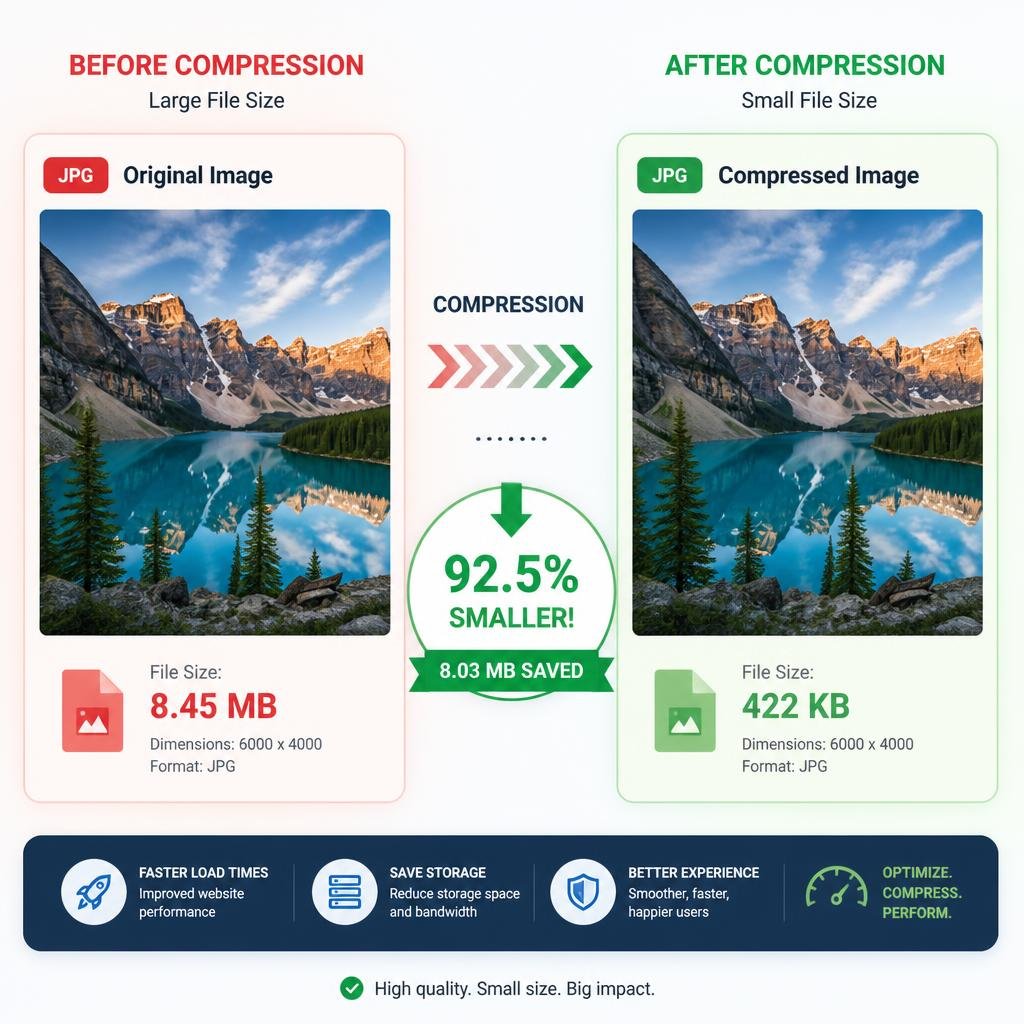
Large uncompressed files slow down websites and eat up storage space. Converting a heavy PNG or TIFF into a compressed JPG or WebP file can shrink the size dramatically while keeping the image usable for web purposes.
Transparency or Background Needs to Change
Some formats support transparent backgrounds others do not. If you need a logo or product photo to sit cleanly on any background you need a format like PNG that preserves transparency which often means converting from JPG first and separating the subject from its background.
Compatibility With Software or Devices
Design software, printers, and older systems sometimes only recognize certain formats. Converting ensures the file opens correctly wherever it needs to be used without compatibility errors.
Common Image Formats and When to Use Each One
Choosing the right target format matters just as much as the conversion itself. Here is a practical breakdown of the formats people convert to and from most often.
JPG (JPEG): Best for photographs and images where small file size matters more than perfect transparency. Does not support transparent backgrounds.
PNG: Best for logos graphics and any image that needs a transparent or see through background. Larger file size than JPG.
WebP: A modern format built for the web offering strong compression with good visual quality. Increasingly required or preferred by e-commerce platforms and website speed tools.
HEIC: Common on iPhones offers excellent compression but is poorly supported outside Apple devices which is why it usually needs converting before upload.
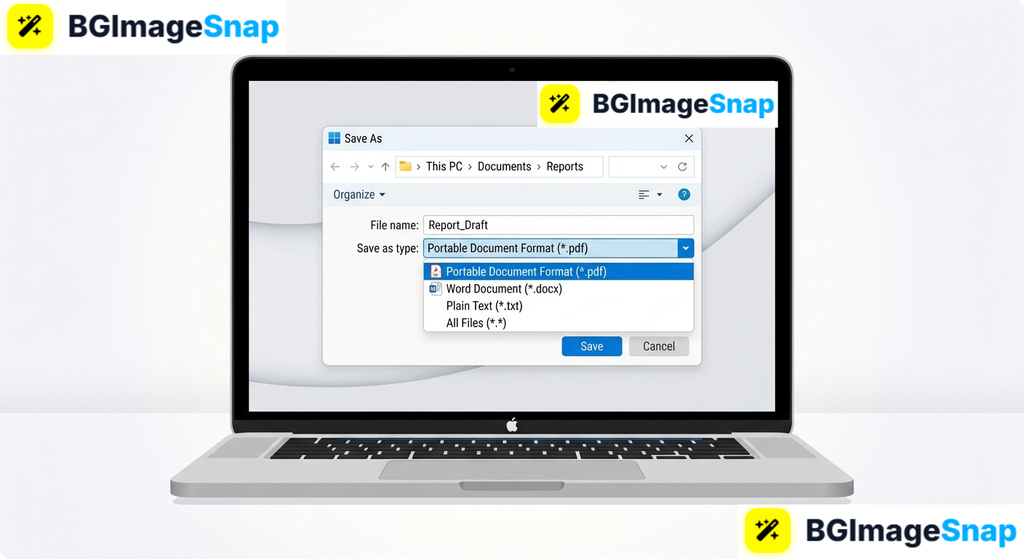
PDF: Used for documents but images are sometimes converted into PDF for printing, sharing, or archiving purposes.
GIF: Best suited for simple animations not recommended for static photos due to limited color range.
Step-by-Step: How to Convert a File Correctly
File Content Conversion the exact steps vary slightly depending on the tool you use but the underlying process for a clean accurate conversion generally follows the same order.
Identify your current file format. Check the file extension (the letters after the dot in the file name) to confirm what you are starting with.
Decide on your target format based on where the file needs to go whether that is a website a marketplace a printer, or an email attachment.
Choose a reliable conversion tool. A browser based tool avoids the need to install software and works on both computer and mobile.
Upload the original file and select the output format you need.
Adjust quality or compression settings if the tool offers them balancing smaller file size against visible detail.
Download the converted file and open it to confirm the content, colors, and any transparency look correct.
Rename the file with a clear descriptive name before uploading it anywhere since generic file names can hurt image SEO.
Converting Images for E-Commerce and Product Photography
Online sellers run into file conversion issues more often than most people realize. A phone camera might save photos in HEIC a marketplace might demand JPG under a certain file size and a product listing might look unprofessional without a clean white or transparent background.
A practical workflow for product images usually looks like this: remove the background from the original photo so the product sits on a clean distraction free backdrop convert the file into the format the platform requires then resize it to meet any dimension or file size limits. Handling these steps out of order often means redoing work for example converting first and then discovering the background still needs removing.
This is where a tool like BGImageSnap becomes genuinely useful since it lets you remove a background convert the format and resize an image within the same browser based workflow without installing design software or learning tools like Photoshop.
Common Mistakes to Avoid When Converting Files
Most conversion problems come down to a handful of avoidable mistakes.
Converting a JPG to PNG expecting transparency to appear automatically. JPG never stores transparency so converting it will not create a transparent background the background must be removed separately first.
Repeatedly converting the same file between lossy formats like JPG which gradually degrades quality each time it is compressed again.
Ignoring file size limits set by the destination platform leading to failed or slow uploads.
Using desktop software for a single quick conversion when a browser based tool would take seconds and require no installation.
Forgetting to check color accuracy after conversion especially when moving between formats with different compression methods.
Frequently Asked Questions
What is file content conversion?
File content conversion is the process of changing a file from one format to another while preserving its underlying content such as converting a PNG image into a JPG or WebP file.
Will converting a file reduce its quality?
It depends on the formats involved. Converting between lossless formats generally preserves quality while converting into a compressed format like JPG can reduce detail slightly especially if done repeatedly.
Can I convert a JPG to a transparent PNG?
Not directly. A JPG file does not contain transparency data so converting it to PNG will keep the same solid background. To get a transparent background the background needs to be removed first then the image saved as a PNG.
What is the best format for product photos?
JPG works well for photos where file size matters while PNG is better when the product image needs a transparent or easily replaceable background which is common for online stores.
Is it safe to convert files using an online tool?
Reputable browserbased tools process files securely and typically do not require software installation. Always check that a tool does not require unnecessary permissions or store your files without your knowledge.
Why does my converted file look different in color?
Some formats handle color profiles differently which can cause slight shifts in brightness or saturation after conversion. Checking the image immediately after converting helps catch this early.
Do I need different software for every file type?
No. Many browser based tools support multiple format conversions in one place which removes the need to install separate software for each file type.
How do I reduce file size without losing too much quality?
Convert to a compression friendly format such as JPG or WebP and adjust the quality setting gradually checking the result at each stage until the file is small enough without visible quality loss.
Conclusion
File content conversion is a small step that solves a surprisingly common set of problems from failed uploads to oversized files to backgrounds that will not cooperate. Understanding which format fits your purpose and following a clean step-by-step process saves time and prevents the quality loss that comes from guessing.
1920×1080 White Solid Background: The Complete Guide to Getting the Perfect Plain White Image.
A plain white background sounds simple until you actually need one that is the exact size the exact shade of white and free of the faint gray tint or JPEG noise that shows up the moment you zoom in. Search “1920×1080 white solid” and you’ll find a mix of stock photo sites forum threads and tools that don’t quite give you a clean ready-to-use file.
This guide covers what a 1920×1080 white solid background actually is why that resolution is the default for so many screens and templates and the different ways to get one whether you want to download a ready-made file create one from scratch in design software or turn an existing photo into a clean white-background image.
You’ll also find a comparison of white versus off-white versus transparent backgrounds the most common mistakes people make when creating them and a short FAQ covering the questions that come up most often.
Table of Contents
What Is a 1920×1080 White Solid Background?
Why 1920×1080 Is the Standard Resolution
Common Uses for White Solid Backgrounds
How to Create a 1920×1080 White Solid Background
White vs. Off-White vs. Transparent Backgrounds
Common Mistakes to Avoid
Best Practices for a Clean White Background
Frequently Asked Questions
Quick Answer: Key Takeaways
1920×1080 is a 16:9 widescreen resolution (Full HD) the same aspect ratio used by most laptop screens YouTube videos and presentation templates.
A “white solid” background means every pixel in the image is the same pure white value (typically hex #FFFFFF) with no gradient, texture, or shadow.
The fastest way to get one is to generate it directly in an image editor or online tool rather than searching stock sites since a generated file has no compression artifacts.
For product photos or portraits it’s usually easier to remove the existi
ng background and replace it with solid white than to start from a blank canvas.
Pure white (#FFFFFF) can look harsh in photography; many professionals use an off-white (#F8F8F8 or similar) that still reads as “white” but is gentler on the eyes.
File format matters: PNG preserves a perfectly flat white with no compression noise while JPEG can introduce faint blotches at high compression.
For print use check whether you need RGB or CMYK color mode a screen-perfect white can shift slightly when printed.
What Is a 1920×1080 White Solid Background?
A 1920×1080 white solid background is an image exactly 1,920 pixels wide by 1,080 pixels tall filled entirely with a single uniform white color. There’s no gradient no vignette no texture just one flat color across every pixel. It’s the digital equivalent of a blank sheet of white paper sized to match a standard widescreen display.
The “1920×1080” part refers to the resolution commonly called Full HD or 1080p. The “white solid” part refers to the content: a single flat color rather than a photo pattern or gradient. Together the two describe one of the most requested background specs online used everywhere from video editing to online forms.
Why 1920×1080 Is the Standard Resolution
1920×1080 became the default resolution for a simple reason: it matches the 16:9 aspect ratio that most laptop screens monitors, TVs, and video platforms settled on over a decade ago. Because so much hardware and software is built around this ratio, a background sized to 1920×1080 will fit cleanly as a desktop wallpaper a Zoom or Teams virtual background a YouTube thumbnail canvas or a slide in PowerPoint and Google Slides without cropping or stretching.
Using a different resolution isn’t wrong but it usually means the image gets automatically resized or cropped by whatever platform you’re uploading it to which can introduce blur or cut off content near the edges. Starting at 1920×1080 avoids that problem for most common uses.
Common Uses for White Solid Backgrounds
A plain white background is one of the most versatile assets in digital work. Here are the situations where it comes up most often.
Product Photography and E-Commerce Listings
Most online marketplaces including Amazon and Etsy require or strongly recommend a pure white background for the main product image. It keeps the focus entirely on the product and creates visual consistency across a whole catalog.
ID Photos, Passport Photos, and Official Documents
Passport, visa, and ID photo requirements almost always specify a plain white or off-white background so the applicant’s face and outline are clearly separated from the surroundings. This is one of the strictest use cases even a light shadow behind the subject can cause a photo to be rejected.
Video Calls and Virtual Backgrounds
A solid white background works well as a virtual background for Zoom, Google Meet, or Teams calls when someone wants a clean distraction-free look without a busy room behind them.
YouTube Thumbnails, Presentations, and Templates
Designers frequently start a thumbnail or slide with a flat white canvas at 1920×1080 because it’s easy to layer text icons and graphics on top without background clutter competing for attention.
Print Materials
Flyers, business cards, and posters often use white as the base layer before print-ready color adjustments are applied since most printed materials start from a white substrate anyway.
How to Create a 1920×1080 White Solid Background
There are three practical ways to get this file depending on whether you’re starting from scratch or working with an existing photo.
Method 1: Generate a Blank Canvas with an Online Tool
This is the fastest option if you just need an empty white rectangle at the right size.
Open a browser-based image tool that lets you set a custom canvas size.
Enter 1920 for width and 1080 for height in pixels.
Set the fill or background color to pure white (#FFFFFF) or an off-white shade if you prefer a softer tone.
Export as PNG to avoid compression artifacts or JPEG at maximum quality if file size matters more.
Create a new document and set the dimensions to 1920 x 1080 px.
Set the resolution to 72 DPI for screen use or 300 DPI if the file will be printed.
Fill the entire background layer with white then flatten the image before exporting.
Double-check there’s no drop shadow, border, or subtle gradient left over from a template.
Method 3: Remove the Background from an Existing Photo
If you already have a photo of a product, person, or object and want it isolated on solid white rather than starting from a blank canvas the quicker route is to remove the existing background from the photo and replace it with solid white. This is the standard workflow for product listings and ID photos since it keeps the subject but swaps out whatever was originally behind them.
White vs. Off-White vs. Transparent Backgrounds
“White” isn’t always the right choice. Depending on where the image will be used an off-white tone or a transparent background may work better.
Can look harsh or clinical in photography; shows dust and lens flare easily
Off-white (#F5F5F5–#FAFAFA)
Professional photography, portraits, brand imagery
May be rejected by platforms that require exact pure white
Transparent (PNG with alpha)
Layering over other designs, logos, overlays
Not accepted for ID photos or most marketplace listings; needs a PNG or WebP file not JPEG
Common Mistakes to Avoid
Using a JPEG at low quality: Heavy JPEG compression introduces faint gray blotches on flat white areas that are invisible until you zoom in use PNG for a perfectly flat background or JPEG at maximum quality only.
Leaving a soft shadow or vignette: Many photo templates add a subtle drop shadow around the edges by default. On a true “solid” background this needs to be removed or flattened out.
Mismatched color mode: A background that looks pure white in RGB on screen can print with a faint tint if it isn’t converted to CMYK correctly for physical materials.
Wrong aspect ratio for the platform: 1920×1080 fits 16:9 uses well but a passport photo or Instagram post has its own required dimensions always check the exact spec before exporting.
Skipping a final zoom-in check: Compression artifacts and stray pixels are often only visible at 100% zoom or higher so it’s worth checking before publishing or submitting the file.
Best Practices for a Clean White Background
Export as PNG whenever the background needs to stay perfectly flat with no compression noise.
Use pure white (#FFFFFF) for official/ID uses and a slightly off-white tone for photography that will be viewed on screen for long periods.
Keep a master file at 1920×1080 and resize down for smaller platforms rather than resizing up which causes blur.
If you’re isolating a subject from a photo check the edges closely stray pixels of the old background are the most common giveaway of a rushed edit.
Save a transparent PNG version alongside the solid white version if you might need to place the subject on a different background later.
Frequently Asked Questions
What size is 1920×1080 in inches?
At 72 DPI (standard screen resolution) 1920×1080 pixels works out to roughly 26.7 x 15 inches. For print it’s typically scaled down and reworked at 300 DPI instead since 1920×1080 alone is too low-resolution for large-format printing.
Is #FFFFFF the only correct white for a background?
No. #FFFFFF is pure white and is often required for ID photos and marketplace listings but many designers use a very light off-white (around #F8F8F8) for photography and branding because it’s softer on the eyes while still reading as “white” to most viewers.
Can I use a 1920×1080 white background as a Zoom virtual background?
Yes. Most video call platforms accept a plain image at this resolution as a custom virtual background and 1920×1080 matches the aspect ratio most webcams and screens use by default.
What’s the difference between a solid white and a transparent background?
A solid white background fills every pixel with white and works in any file format including JPEG. A transparent background has no fill at all in the empty areas and requires a format that supports transparency such as PNG or WebP it’s used when you plan to place the subject over a different background later.
Do I need special software to create a white background, or can I use a free online tool?
A free browser-based tool is usually enough for a plain white canvas or for removing a background from an existing photo. Design software like Photoshop or GIMP is more useful when you need finer control such as custom color modes for print.
Why does my white background look gray or blotchy after saving?
This is almost always JPEG compression. Flat colors like solid white are especially prone to visible compression artifacts at lower quality settings. Re-exporting as PNG or as JPEG at maximum quality usually fixes it.
Conclusion
A 1920×1080 white solid background is a simple asset with a specific set of requirements: the right pixel dimensions a truly flat and uniform color and a file format that won’t introduce compression noise. Whether you’re building one from a blank canvas for a presentation or stripping the background out of an existing product photo the fastest path is usually a purpose-built online tool rather than manually editing pixel by pixel.
Don’t Stop Here! Discover More Expert Tips & Guides